

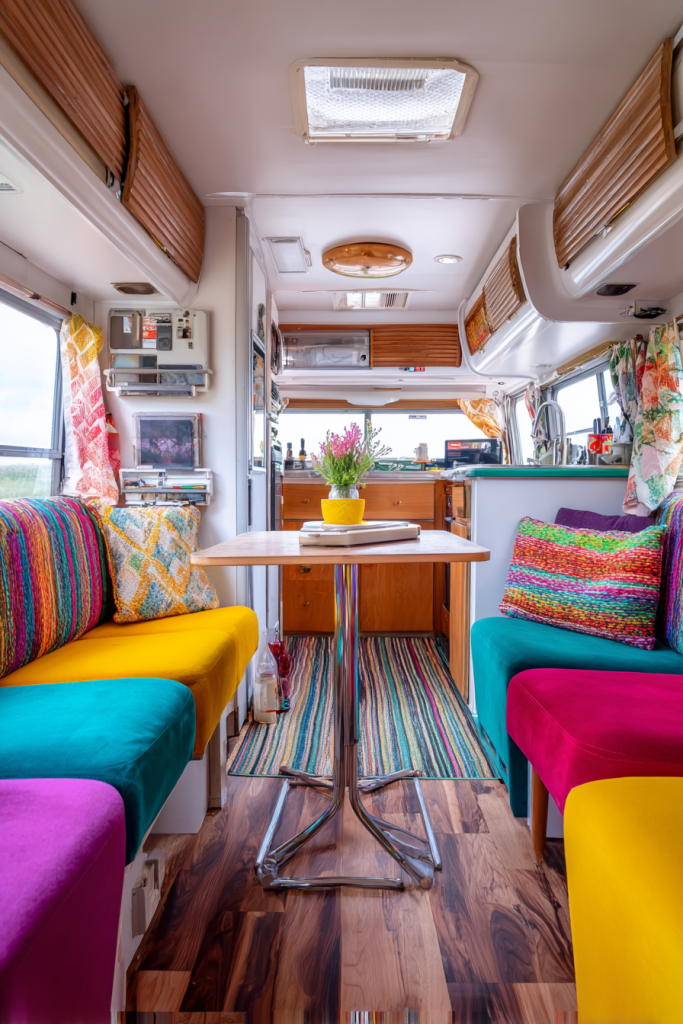
The traditional RV dinette doesn’t have to be your only option anymore. As someone who’s spent countless hours redesigning compact living spaces, I’ve discovered that the standard booth-style seating often wastes precious square footage and limits functionality. Your RV should adapt to your lifestyle, not the other way around.
Modern RV living has evolved beyond simple meal preparation and dining. Today’s travelers work remotely, entertain guests, pursue hobbies, and need versatile spaces that serve multiple purposes throughout the day. The old-fashioned dinette setup, while functional, often creates a bottleneck in your RV’s flow and prevents you from maximizing every inch of your mobile home.
These 21 innovative replacement ideas will help you create a more functional, comfortable, and personalized living space. From convertible work stations to cozy reading nooks, each solution addresses common RV challenges while enhancing your travel lifestyle. You’ll discover options for every budget, skill level, and design preference.
Whether you’re a weekend warrior seeking more storage, a full-time traveler needing a dedicated workspace, or a family wanting better entertainment options, these ideas will inspire your next RV renovation project. Let’s explore how small changes can make a massive impact on your mobile living experience.
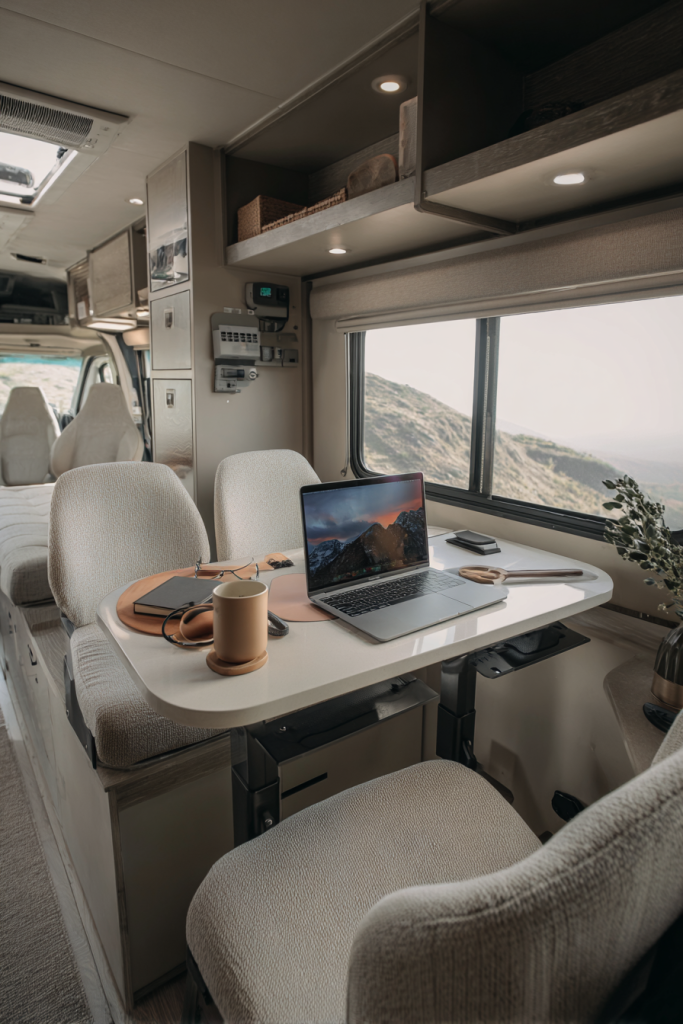
1. Design a Dual-Function Workspace
Transform your dinette area into a versatile workspace that seamlessly transitions between dining and office functions. I’ve helped countless remote workers create adjustable setups using height-variable tables and ergonomic seating. The key lies in choosing furniture that adapts quickly to different needs throughout the day.
Consider installing a pneumatic height-adjustable table that moves from standard dining height to comfortable desk level. Pair this with swivel chairs that offer proper lumbar support for extended work sessions. Add charging stations and cable management systems to keep technology organized. Storage solutions like rolling carts can hold office supplies during work hours and dining essentials during meals.
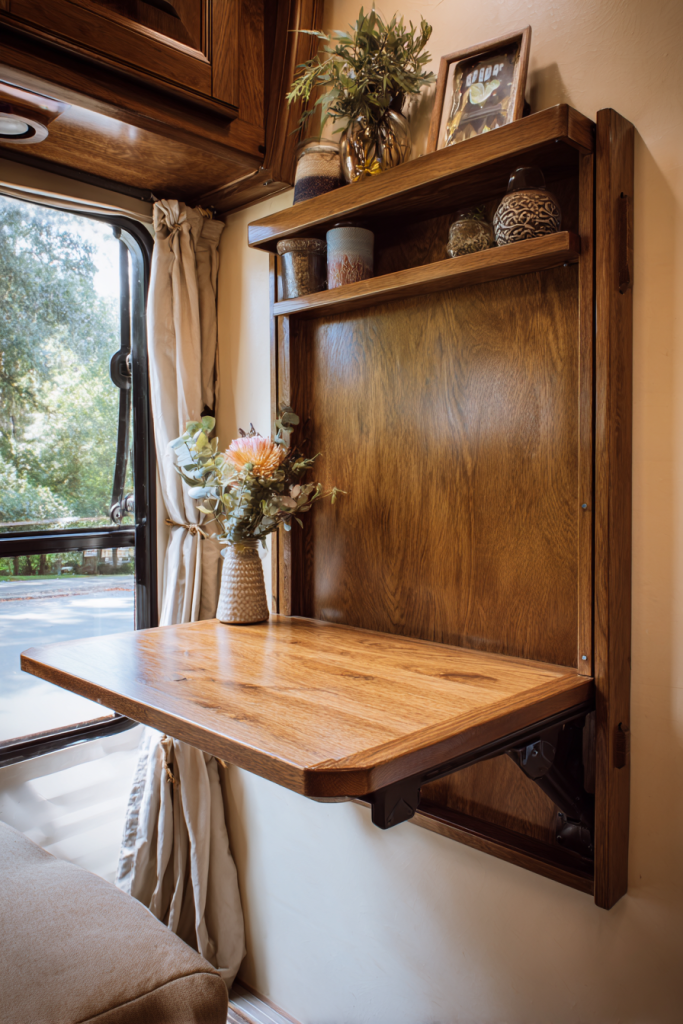
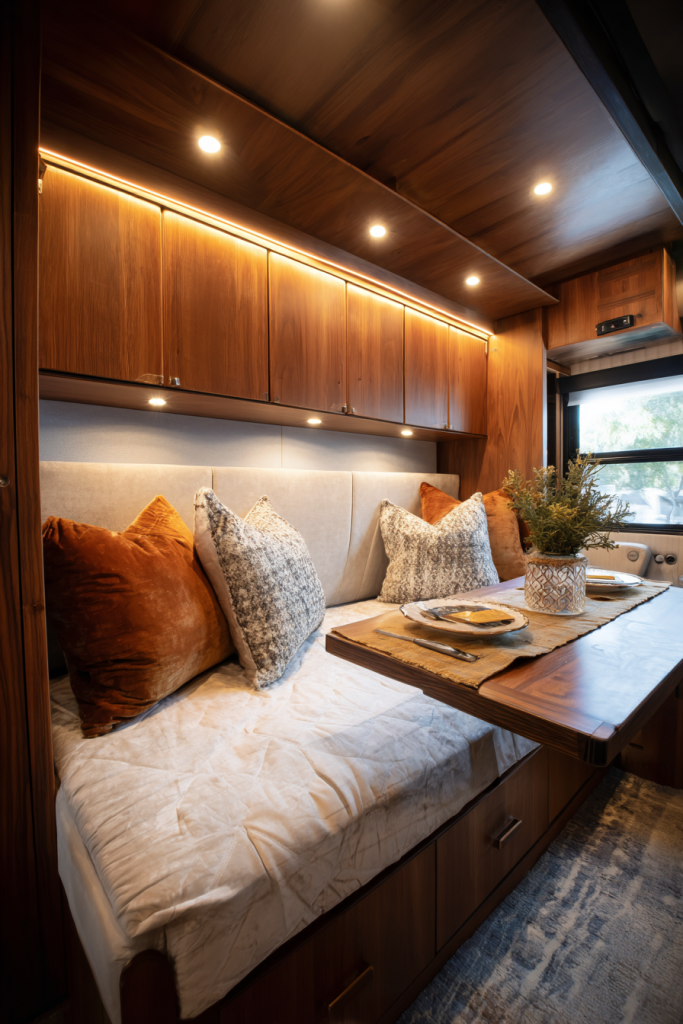
2. Install a Wall-Mounted Folding Table
Wall-mounted folding tables revolutionize small space living by disappearing completely when not needed. I installed one in my client’s 25-foot travel trailer, instantly creating 12 square feet of additional floor space. The psychological impact of this extra room makes the entire RV feel significantly larger.
Choose a robust folding mechanism that can support at least 50 pounds when extended. Mount it at standard dining height (30 inches) with proper wall anchors rated for RV construction. Consider adding a small shelf underneath for storage when folded. Soft-close hinges prevent slamming and extend the table’s lifespan. Match the table surface to your existing cabinetry for a cohesive look.
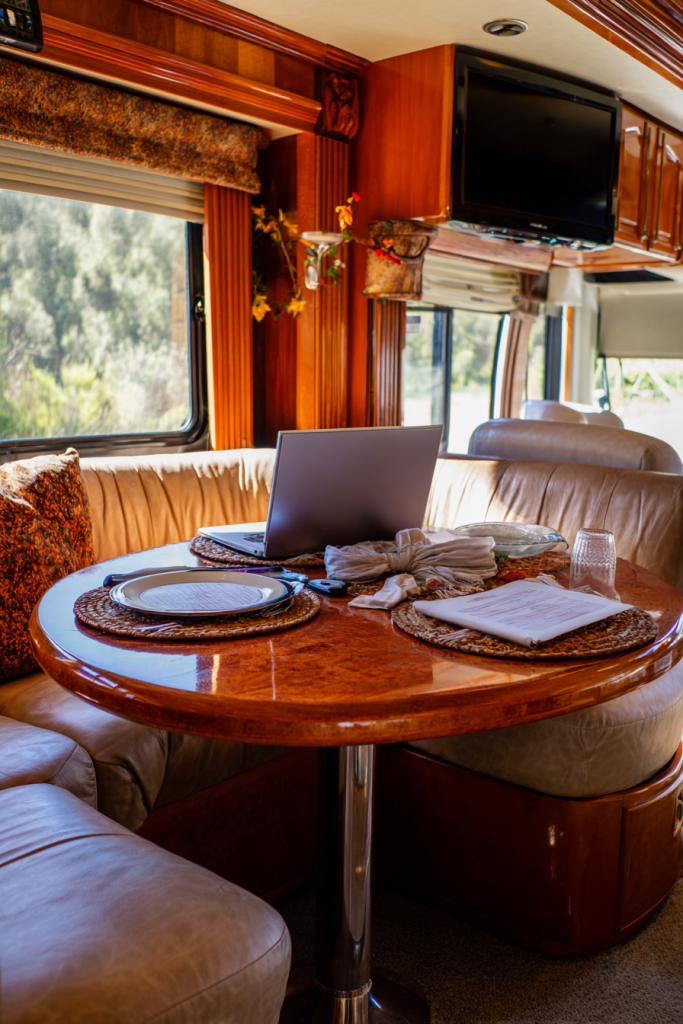
3. Create a Swivel Table Station
Swivel tables offer unmatched flexibility in tight quarters, rotating to accommodate different seating arrangements and activities. During my recent RV renovation, I installed a pedestal-mounted swivel table that serves the sofa, captain’s chairs, and entry area depending on its position.
Select a heavy-duty swivel base designed for RV use, ensuring it locks securely in multiple positions. The tabletop should be round or oval to prevent sharp corners in the rotating space. Consider a diameter between 36-42 inches for optimal functionality without overwhelming the area. Add anti-slip pads to prevent items from sliding during travel, and ensure the mechanism operates smoothly even after thousands of rotations.
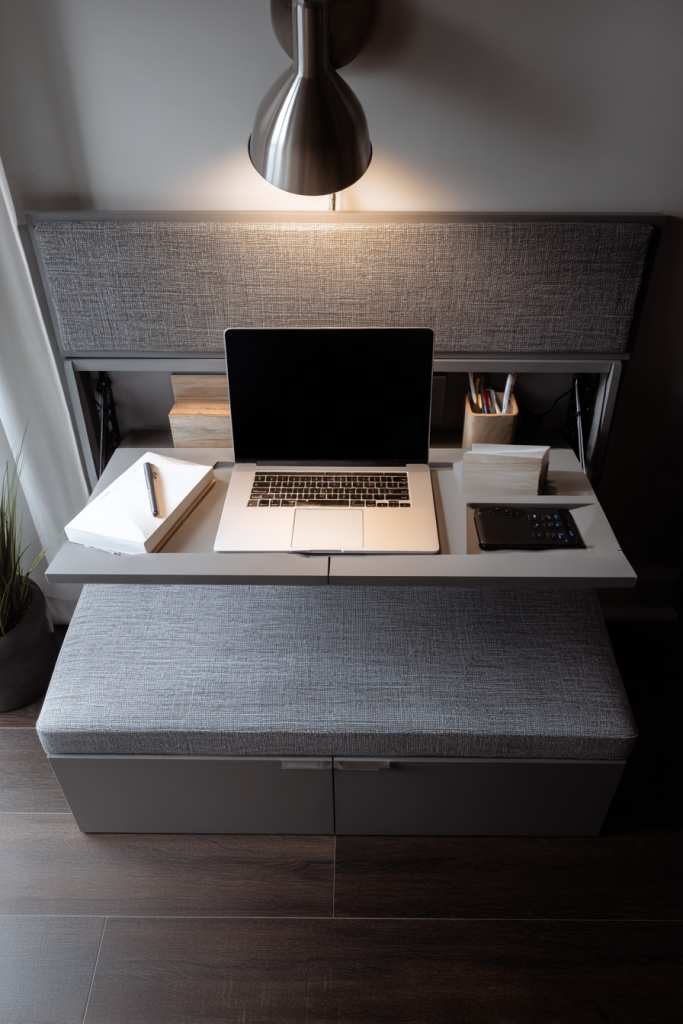
4. Build a Pop-Up Desk System
Pop-up desks provide dedicated workspace without permanent footprint commitment. My favorite installation uses a spring-loaded mechanism that raises a desk surface from within a storage bench. When work is complete, everything disappears, leaving clean lines and open space.
Design the system with a depth of at least 24 inches for comfortable laptop use. Include integrated power outlets and USB charging ports within the desk surface. Consider adding a small hutch that pops up simultaneously, providing vertical storage for books and supplies. Soft-touch mechanisms ensure quiet operation, important in the close quarters of RV living.
5. Install a Hideaway Table System
Hideaway tables retract completely into cabinetry, preserving maximum open space when not in use. I love using drawer slide mechanisms rated for heavy-duty applications, allowing smooth extension and retraction even when loaded with dishes or work materials.
Install the system at counter height (36 inches) for versatile use as both dining and prep space. Ensure the extended table has adequate support legs that deploy automatically. Include safety locks to prevent accidental retraction during use. Consider adding LED strip lighting underneath to illuminate the extended surface. The mechanism should operate smoothly with one hand for easy deployment.

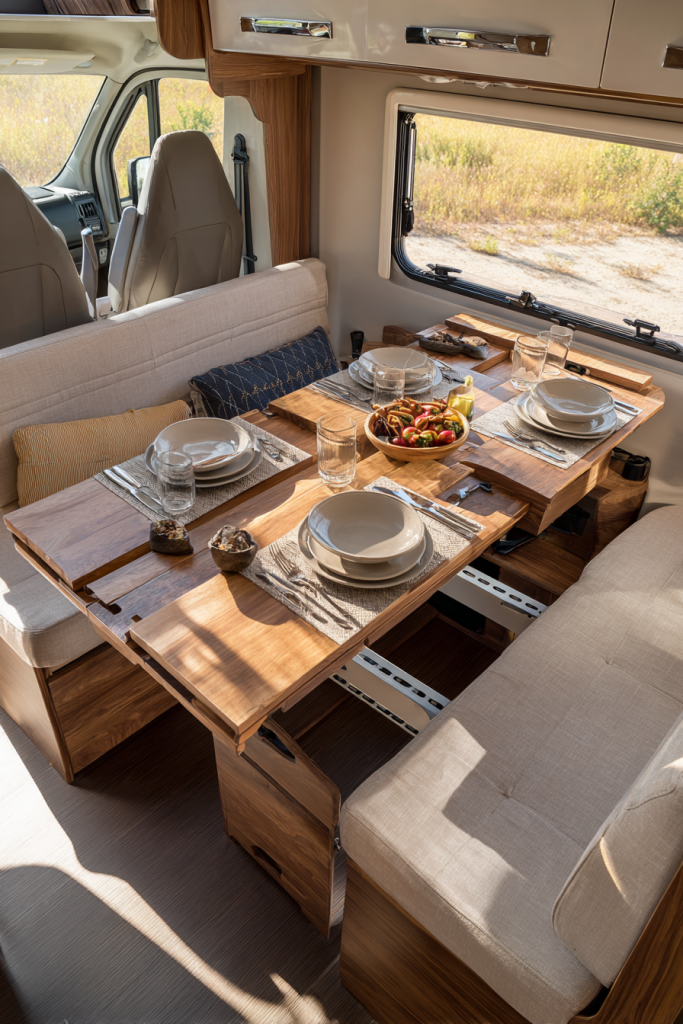
6. Design a Slide-Out Extension Table
Slide-out tables expand your dining capacity while retracting for daily living. The telescoping design I installed in a client’s fifth wheel extends from 24 inches to 48 inches, accommodating intimate dinners or larger gatherings. Heavy-duty drawer slides ensure smooth operation even when fully loaded.
Choose ball-bearing slides rated for at least 100 pounds per pair. The extension mechanism should lock securely at multiple positions. Consider butterfly leaves that fold down when retracted to minimize storage width. Add rubber bumpers to prevent over-extension damage. Position the table to allow comfortable seating on at least three sides when fully extended.
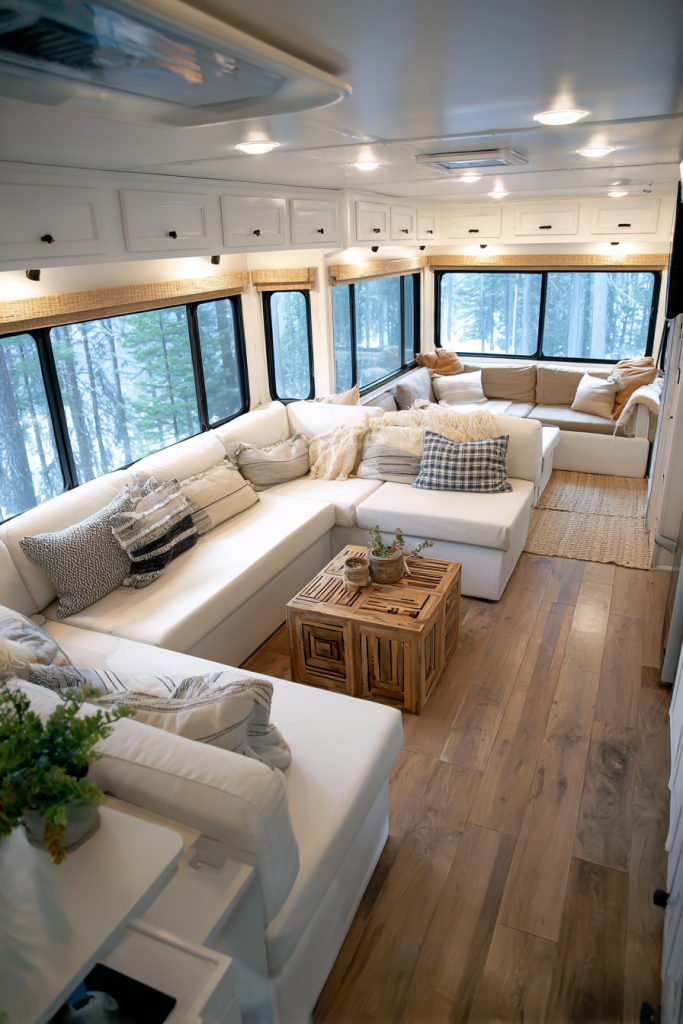
7. Use Lightweight Modular Furniture
Modular furniture systems offer ultimate flexibility, allowing complete reconfiguration based on current needs. I replaced a fixed dinette with lightweight aluminum and fabric pieces that weigh 60% less than traditional RV furniture. Residents can create dining areas, lounges, or open floor space within minutes.
Select pieces with interlocking mechanisms for stability during travel. Consider nesting tables that stack compactly when not needed. Choose fabrics that resist staining and clean easily. Modular seating should have secure connection points to prevent shifting. Include storage ottomans that double as seating and provide hidden storage for linens or games.
8. Install a Drop-Down Dining Table
Drop-down tables mount to the ceiling and lower when needed, keeping floor space completely clear. This solution works beautifully in RVs with adequate ceiling height. I installed one using a pulley system with soft-stop mechanism, creating an elegant dining solution that amazes every visitor.
Ensure your RV ceiling can support the mounting hardware and table weight. Install reinforcing plates if necessary. The lowering mechanism should operate smoothly and lock securely at dining height. Consider a tabletop that stores flat against the ceiling when raised. Add safety cables to prevent accidental falling, and include LED lighting integrated into the table edge for ambient dining illumination.
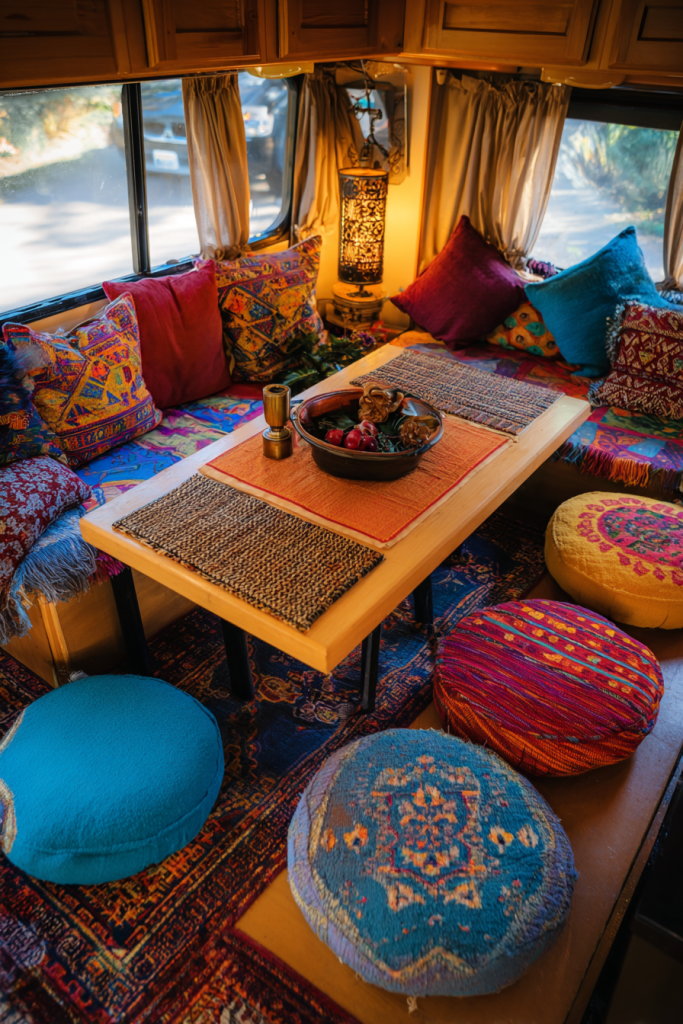
9. Create a Dining Lounge Area
Low-profile lounge dining transforms your RV into a relaxed social space inspired by Middle Eastern and Asian dining traditions. I helped a couple create this setup using floor cushions and a low central table, perfect for their meditation and yoga lifestyle.
Select a coffee table height surface (16-18 inches) with rounded corners for safety. Use washable floor cushions with firm support cores. Consider a sunken floor area if your RV construction allows. Add back support options like wedge cushions against the walls. Include storage underneath the platform for cushions and the low table when traveling.
10. Install a Murphy-Style Bed Combo
Murphy bed combinations serve as seating during the day and comfortable sleeping at night. The vertical fold-down mechanism I installed in a Class B van creates a full dining banquette that converts to a queen-size bed. This maximizes both seating and sleeping capacity in minimal square footage.
Choose a mechanism rated for nightly use with proper spring counterbalancing. The folded position should provide comfortable back support for dining. Include safety straps to secure bedding when folded up. Consider integrated side tables that remain accessible in both configurations. Ensure adequate clearance for the bed to fold down without interfering with other furniture or fixtures.
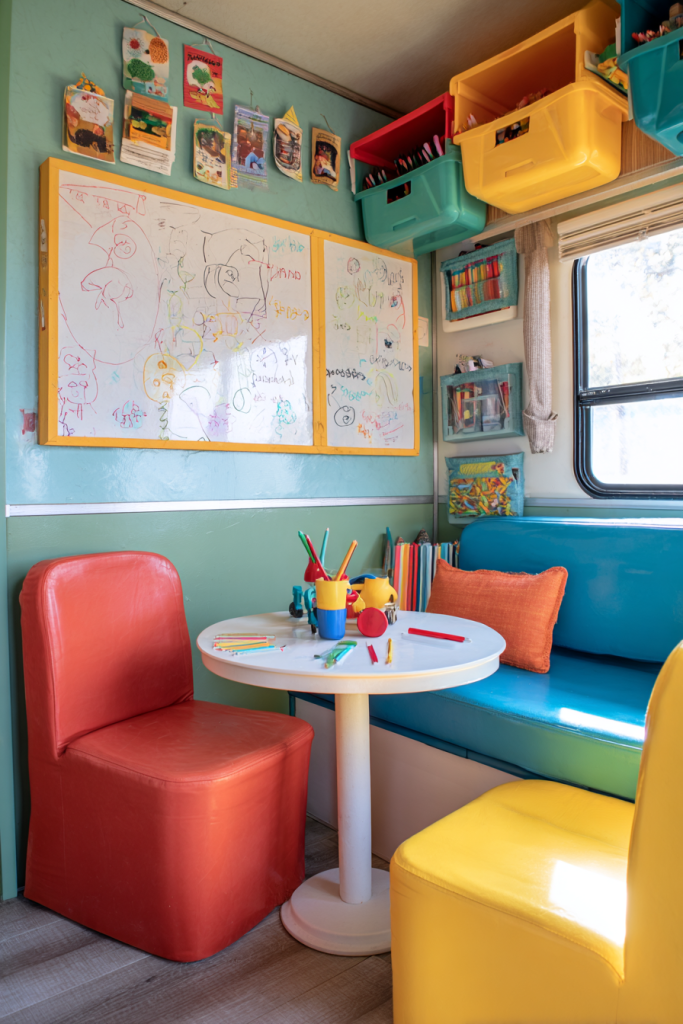
11. Design a Kids’ Activity Zone
Transform your dinette into a dedicated children’s space that keeps young travelers engaged and organized. I created this setup for a family of five, incorporating low seating, washable surfaces, and abundant storage for toys, books, and art supplies. The rounded corners and soft materials ensure safety during travel.
Install child-height seating around 12-14 inches high with storage compartments underneath. Choose wipeable vinyl or marine-grade fabric that resists spills and markers. Add a magnetic board or chalkboard surface to one wall for drawing and games. Include bins and cubbies sized for small hands. Consider adding seat belts to seating for safety during travel, and ensure all edges are rounded or padded.
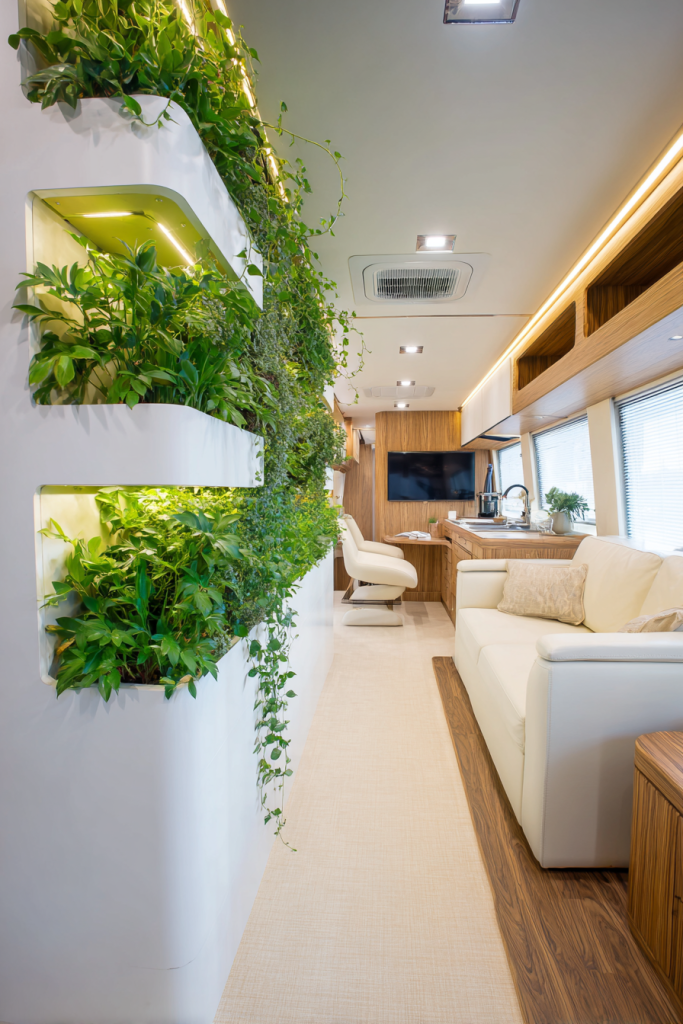
12. Install Built-In Garden Planters
Incorporate living plants into your dinette replacement with custom-built planters that bring nature indoors. During my recent renovation, I created a plant wall system using self-watering planters that thrive even during travel. The natural elements reduce stress and improve air quality in your mobile home.
Design planters with proper drainage and removable liners for easy maintenance. Install grow lights on timers to ensure plants thrive regardless of parking location. Choose plants that tolerate vibration and varying light conditions, such as pothos, snake plants, or herbs. Include watering systems that prevent spills during travel. Position planters to create natural room division while maintaining sight lines.
13. Create Modular Seating Solutions
Flexible modular seating adapts to any occasion, from intimate dinners to large gatherings. I designed a system using lightweight cubes that function as seats, ottomans, or tables depending on configuration. Each piece includes hidden storage and connects securely to others for stability.
Select uniform-sized modules that nest together for travel storage. Include locking mechanisms that secure pieces during transport. Choose firm foam cores that maintain shape over time. Consider pieces with reversible tops – one side for seating, the other for table use. Add handles for easy repositioning and non-slip bottoms to prevent sliding on RV floors.
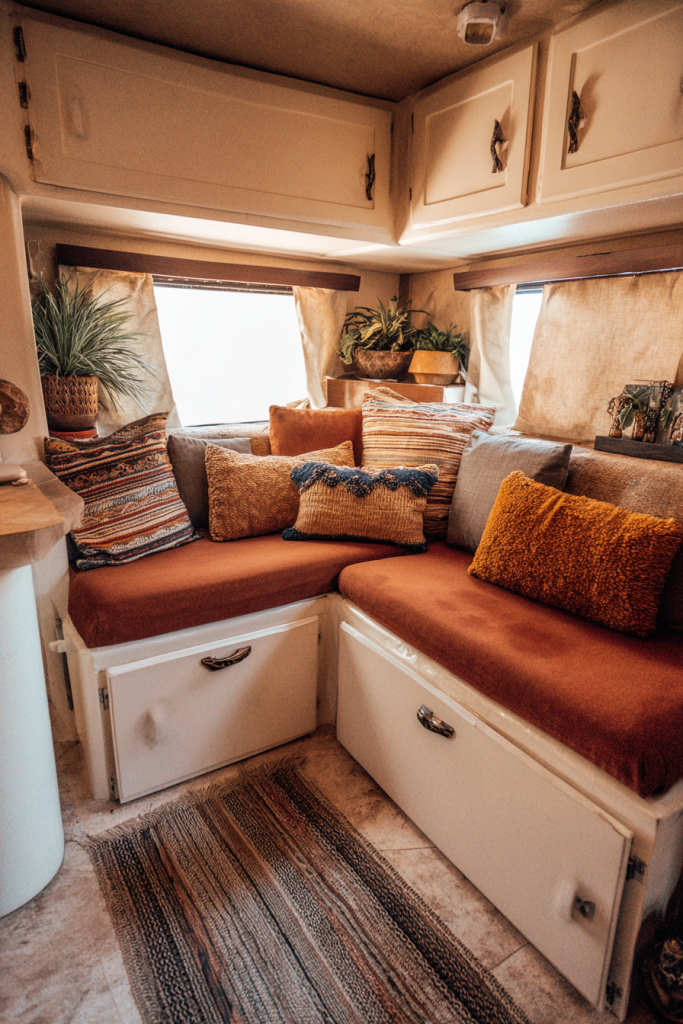
14. Install Storage Bench Seating
Storage benches maximize every inch by combining seating with hidden storage compartments. My favorite design uses hydraulic hinges that hold lids open safely while accessing contents. The deep storage accommodates everything from linens to outdoor gear.
Build benches 18 inches high for comfortable seating and maximum storage depth. Install soft-close hinges to prevent slamming. Add safety stays to keep lids open during access. Consider divided compartments for organization. Include cushions with ties or Velcro attachments to stay in place during travel. Position benches to create conversation areas while providing convenient storage access.
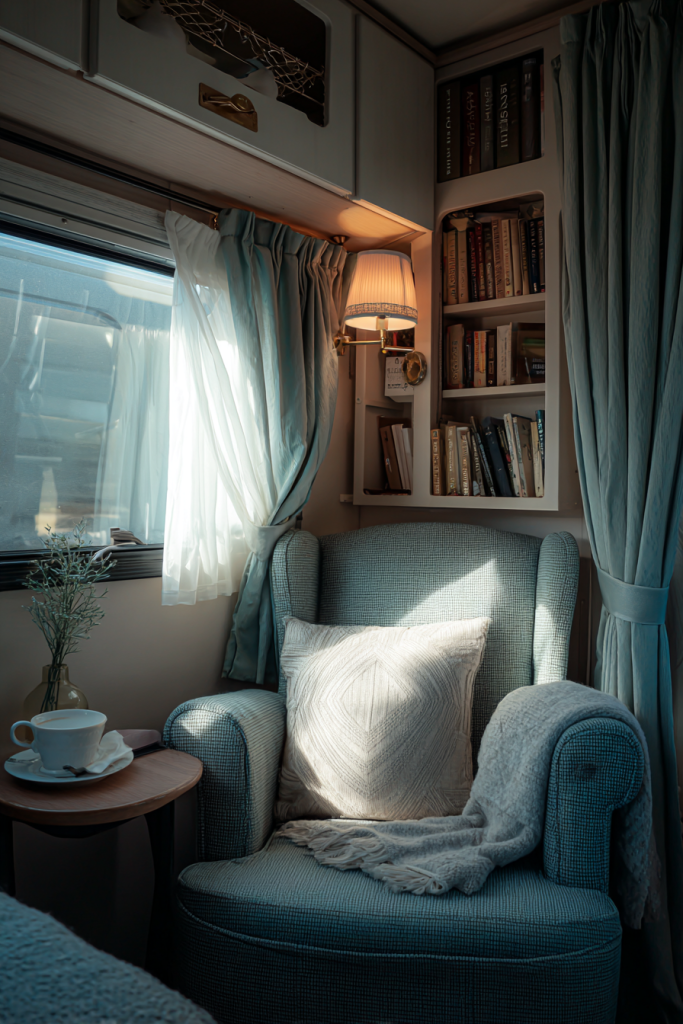
15. Design a Reading Retreat
Create a peaceful reading nook that encourages relaxation and provides escape from travel stress. I transformed a dinette corner into a literary haven using built-in bookshelves, adjustable lighting, and plush seating. The result is a personal sanctuary that enhances mental well-being on the road.
Install adjustable reading lights to prevent eye strain. Include book storage within arm’s reach of seating. Choose extra-firm cushions that provide proper support for extended reading sessions. Add a small side surface for beverages and reading glasses. Consider window placement to take advantage of natural light during daytime reading. Include blanket storage for cozy evening sessions.
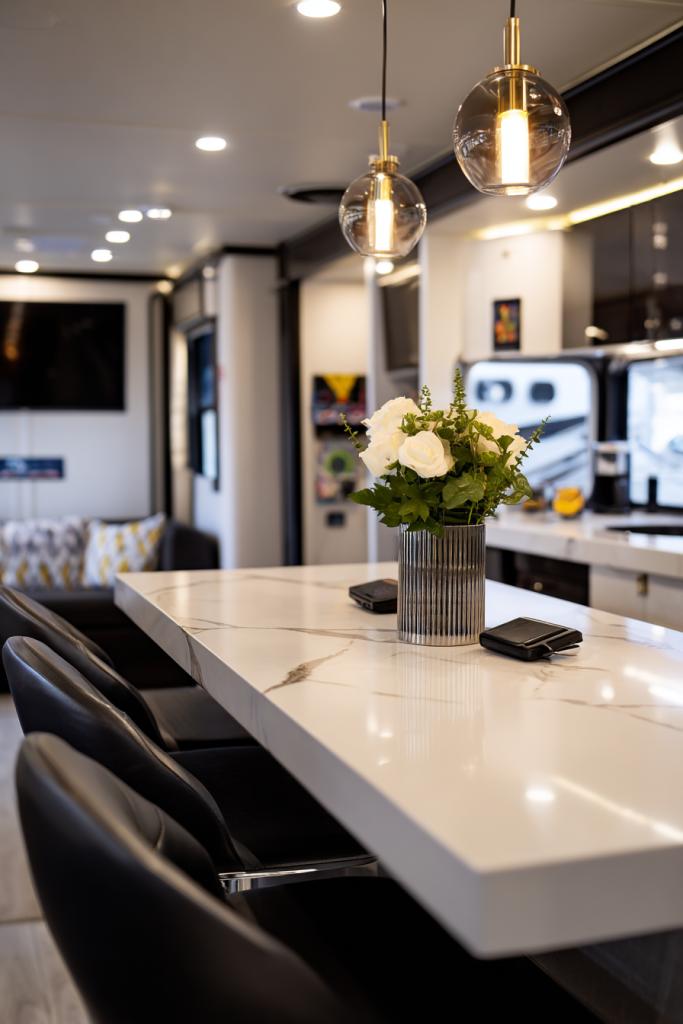
16. Install a Breakfast Bar Setup
Modern breakfast bars create an open, airy feeling while providing efficient dining and work space. The elevated counter design I installed in a Class A motorhome includes bar-height seating that tucks completely underneath, freeing floor space for activities and improving traffic flow.
Position the bar at 42 inches high with 24-inch deep countertop for comfortable dining and laptop use. Select stools that adjust from 24-30 inches to accommodate different users. Include footrests for comfort during extended sitting. Add electrical outlets and USB charging ports along the bar face. Consider pendant lighting over the bar area for task illumination and ambiance.
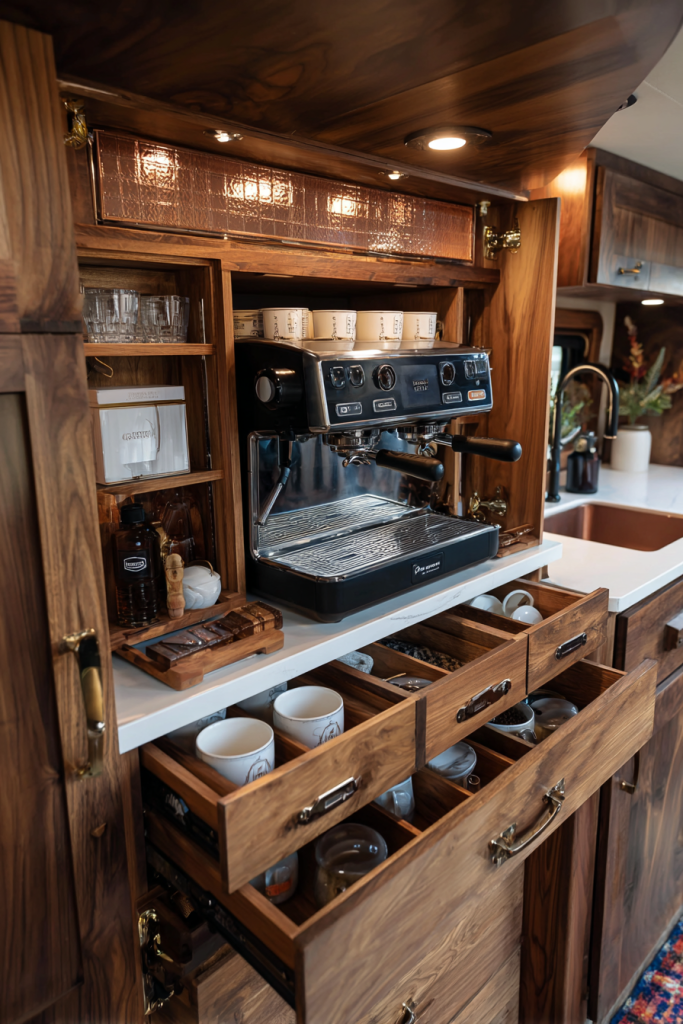
17. Create a Coffee Bar Station
Dedicated coffee stations bring café luxury to RV living while organizing all brewing essentials in one convenient location. I designed this setup for coffee enthusiasts, incorporating everything from bean storage to milk frothing equipment in a compact, efficient layout.
Install a countertop at standard kitchen height (36 inches) with electrical outlets for multiple appliances. Include pull-out drawers for coffee accessories and overhead storage for mugs and supplies. Add a small sink if plumbing allows, or include a water reservoir system. Consider a coffee maker garage that hides appliances when not in use. Include adequate ventilation to prevent moisture buildup from brewing activities.
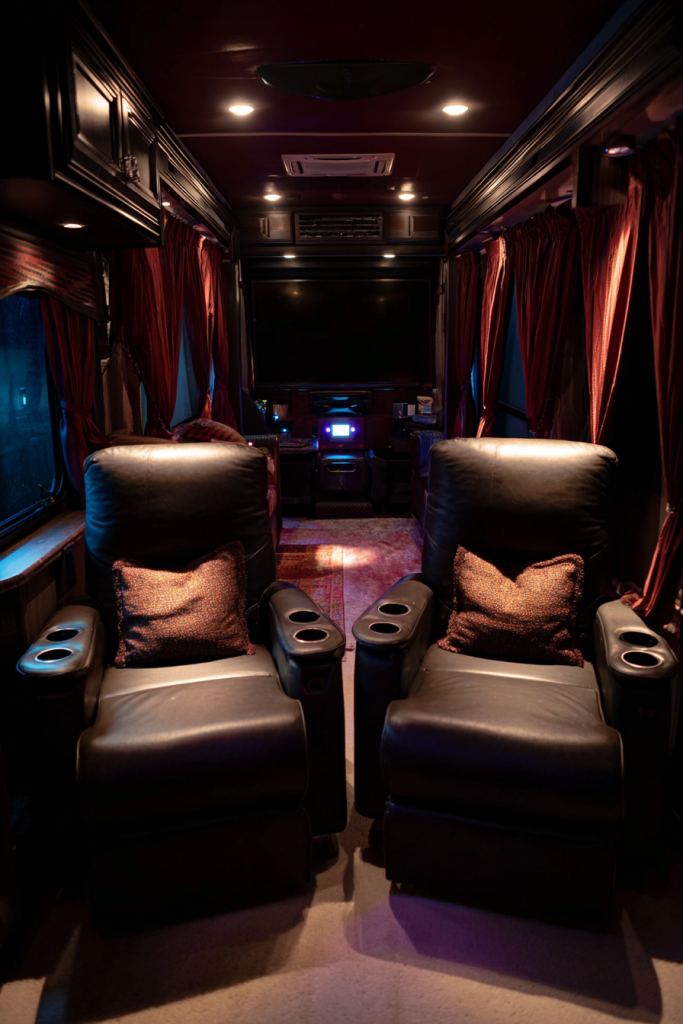
18. Install Theater Seating
Transform your RV into a mobile entertainment center with dedicated theater seating that provides ultimate comfort for movie nights and gaming sessions. The reclining seats I installed in a luxury coach create a true cinematic experience while maximizing floor space efficiency.
Choose recliners designed for RV use with secure mounting systems. Install cup holders and storage compartments in armrests. Include electrical connections for heated seats and massage functions if desired. Position seating for optimal viewing angles to entertainment systems. Add blackout curtains and dimmable lighting to complete the theater atmosphere. Consider seats that fold flat for additional floor space when not viewing.
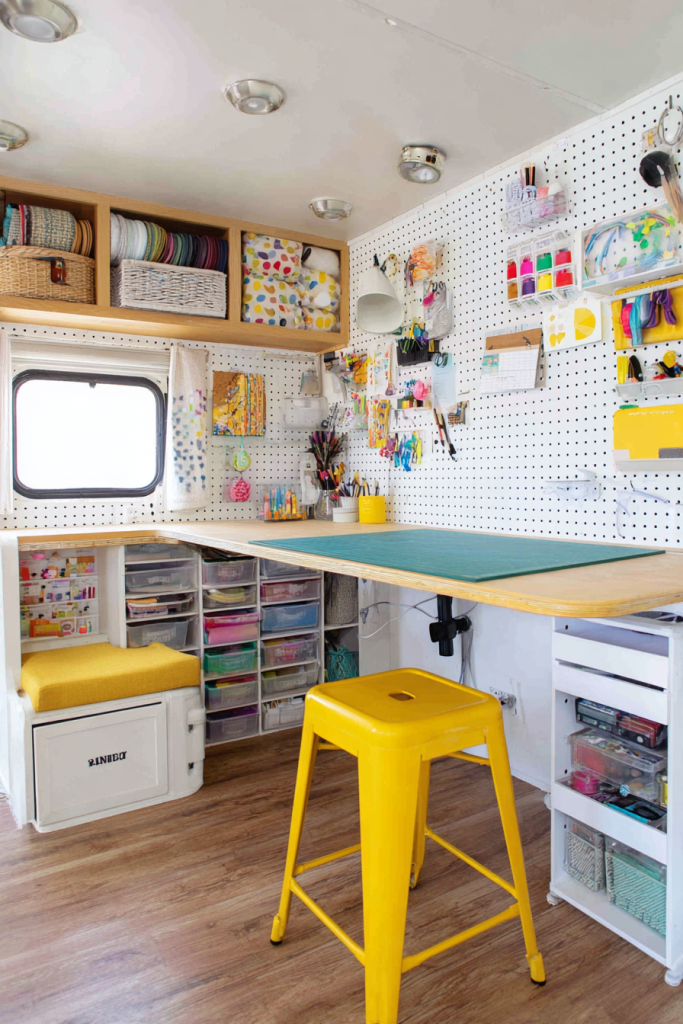
19. Design a Craft Room Setup
Mobile crafting requires organized storage and adequate work surface that accommodates various hobbies from sewing to scrapbooking. My craft room design includes adjustable lighting, specialized storage, and surfaces that clean easily after messy projects.
Install work surfaces at comfortable standing height (36 inches) with good task lighting overhead. Include storage for supplies organized by project type. Add a cutting mat surface that can be removed for cleaning. Consider fold-down extensions for larger projects. Include electrical outlets for tools and adequate ventilation for adhesives or paints. Design storage that prevents supplies from shifting during travel.
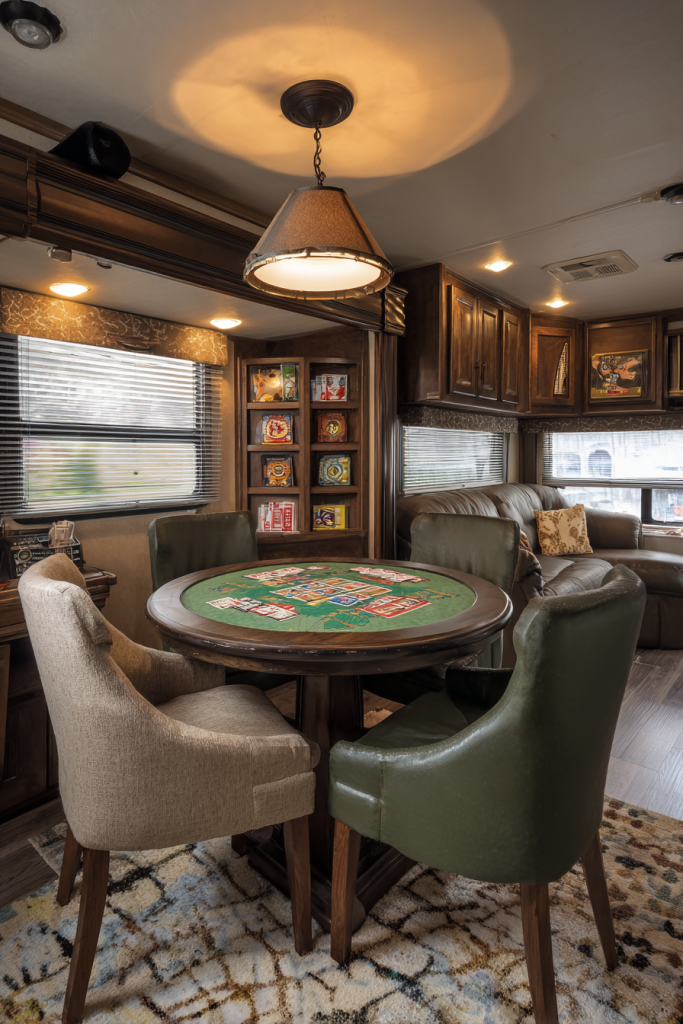
20. Create a Game Table Area
Dedicated gaming spaces encourage family interaction and provide entertainment during bad weather or rest days. I designed a gaming setup with felt-lined surfaces, chip storage, and comfortable seating that converts ordinary RV time into memorable family experiences.
Install a table with cushioned edge padding for comfortable arm rest. Include storage for games, cards, and accessories within easy reach. Add adequate lighting to prevent eye strain during extended play. Consider a felt or vinyl surface that cards glide across easily. Include cup holders to prevent spills on game components. Design seating that allows easy entry and exit for different players.
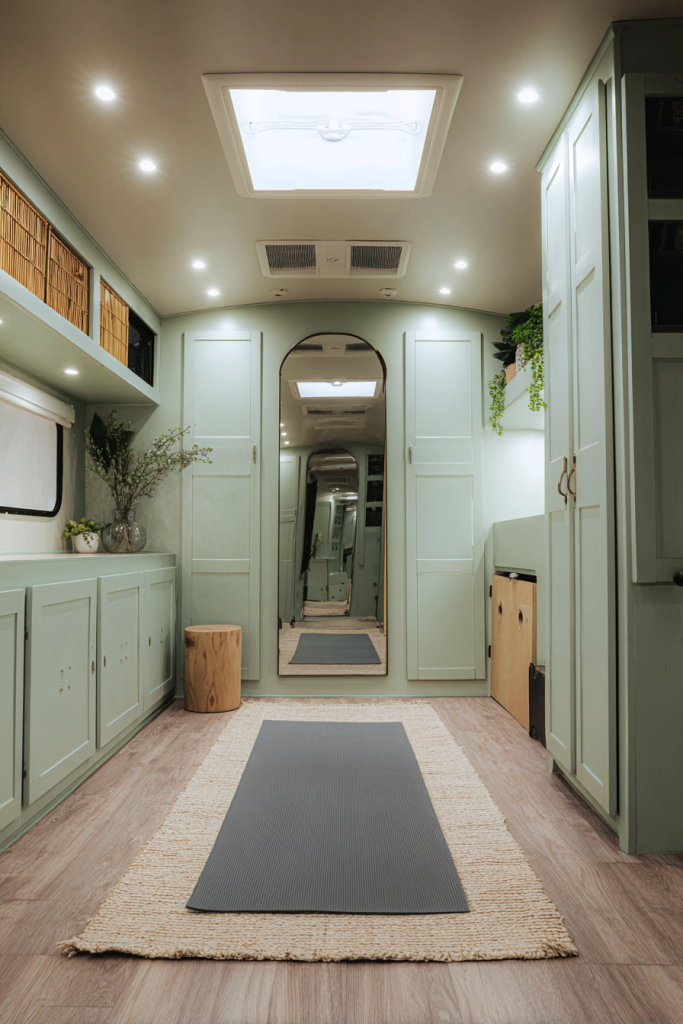
21. Install a Wellness Station
Create a dedicated space for health and wellness activities including yoga, meditation, and exercise. This setup I designed includes mirror walls, storage for equipment, and surfaces that clean easily after workout sessions. The mental and physical benefits enhance the overall RV lifestyle experience.
Install mirrors on wall surfaces to create the illusion of more space while enabling exercise form checking. Include storage for yoga mats, resistance bands, and small equipment. Choose flooring that provides cushioning and traction for various activities. Add ventilation fans to manage humidity from exercise activities. Consider fold-down barre attachments for ballet or physical therapy exercises.
Conclusion
Your RV dinette replacement should reflect your lifestyle, not limit it. These 21 ideas demonstrate that small spaces can accommodate big dreams when approached creatively. Whether you choose a simple storage bench upgrade or a complete theater installation, each modification should enhance your travel experience and bring you joy on the road.
The key to successful RV renovation lies in careful planning, quality materials, and installations that consider the unique demands of mobile living. Start with one area that addresses your biggest frustration, then expand your improvements over time. Remember that every square inch counts in RV living, so choose solutions that serve multiple purposes whenever possible.
Your mobile home should adapt to support your passions, work requirements, and relaxation needs. With these innovative dinette replacements, you can create spaces that rival traditional homes while maintaining the freedom and flexibility that drew you to RV life in the first place.
Frequently Asked Questions
How much does it typically cost to replace an RV dinette?
RV dinette replacement costs vary widely based on complexity and materials. Simple solutions like storage benches or modular seating range from $200-800, while custom installations like Murphy beds or theater seating can cost $2,000-8,000. DIY projects reduce costs significantly, but professional installation ensures proper structural support and safety compliance.
Can I modify my RV dinette without affecting the warranty?
Most RV warranties allow interior modifications that don’t compromise structural integrity or safety systems. Always consult your warranty documentation before beginning work. Document original configurations with photos and keep removed components in case restoration becomes necessary. Professional installation may actually protect warranty coverage for related systems.
What tools do I need for most RV dinette replacement projects?
Essential tools include a drill with various bits, circular saw, measuring tape, level, safety equipment, and basic hand tools. More complex projects may require specialized hardware like heavy-duty hinges, drawer slides, or mounting systems. Many RV supply stores rent specialized tools for weekend projects, making professional-quality results achievable for DIY enthusiasts.
How do I ensure my dinette replacement is safe during travel?
All replacement furniture must be properly secured to prevent movement during travel. Use appropriate fasteners rated for RV construction, typically requiring mounting to structural elements rather than just wall surfaces. Include safety straps or locking mechanisms for moveable components. Test all connections thoroughly before hitting the road, and conduct regular maintenance checks.