
You know what I’ve learned after years of decorating? The best pieces in your home are the ones that tell a story.
And there’s something magical about taking forgotten stuff from your garage or attic and turning it into gorgeous light fixtures. Seriously. The first time I made a lamp from an old household item, I was blown away. This random thing I almost threw away became the centerpiece everyone asks about.
Here’s the thing about upcycling…
It’s not just about being eco-friendly. Sure, that’s nice. But it goes deeper than that.
When you create something yourself, every scratch and dent becomes part of the story. Those “imperfections”? They’re what make your piece unique. Mass-produced stuff from Target can’t compete with that.
I’m about to share 16 DIY lamp ideas that’ll change how you look at household items. We’re talking vintage teacups. Rustic driftwood. Old mason jars. Even kitchen utensils.
The best part?
You don’t need fancy tools or mad skills. Most of these projects take a weekend at most. Some take less than an hour.
Whether you’re a DIY pro or this is your first project, there’s something here for you. And trust me – your guests will flip when they see these unique lights in your home.
Let’s dive in.
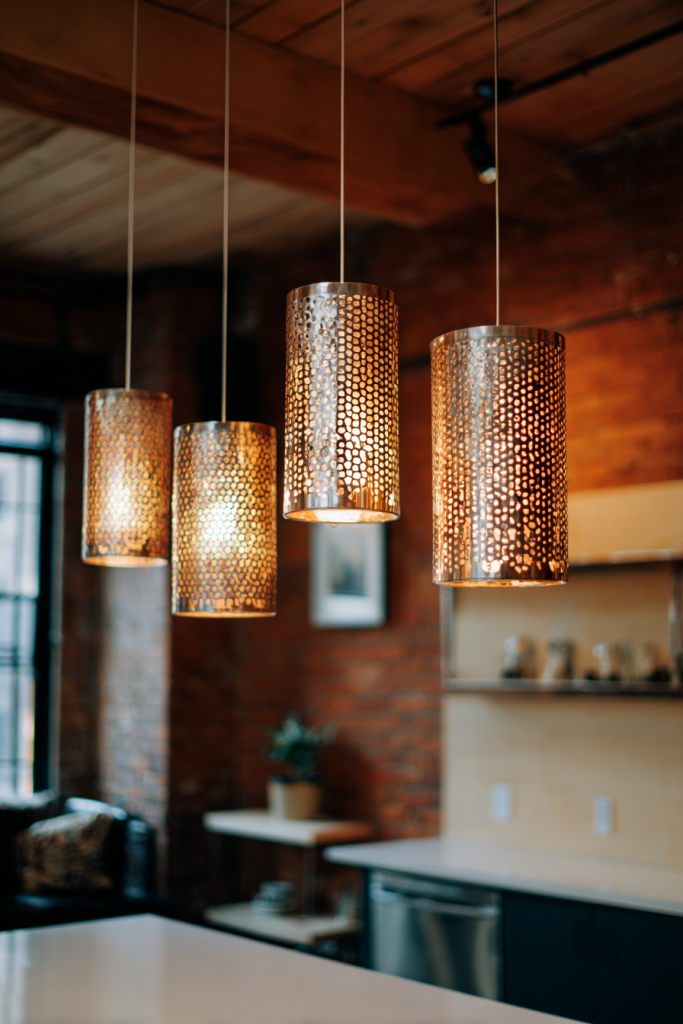
1 Vintage Tin Can Pendant Lamp
Empty tin cans into industrial-chic pendant lights? Yes, please.
I love this project because it combines two things I care about: sustainability and style. Those cans you’re about to recycle? They can have a glamorous second life.
The perforated patterns cast the coolest shadows on your walls and ceiling. It’s like having art that changes throughout the day.
Here’s what you do:
Clean your tin cans thoroughly. Get those labels off completely. Then grab a hammer and nail to punch patterns into the sides.
Try geometric designs. Or floral motifs. Even random dots look amazing.
For the finish, I recommend metallic spray paint. Copper looks incredible. So does brass or matte black.
Pro tip: Hang three cans at different heights above your kitchen island. The effect? Absolutely dramatic.
This works beautifully in lofts, modern farmhouses, or any space that needs an industrial edge.
2 Repurposed Spray Can Chandelier
Okay, hear me out on this one.
Empty spray paint cans. As a chandelier.
I know it sounds weird. But when I saw this at a design expo, I immediately fell in love. It’s edgy. Contemporary. And brings serious street art vibes into your space.
The setup is straightforward:
Collect empty spray cans in different sizes. Clean them really well. Remove the nozzles and create an opening at the bottom for your light fixtures.
Then arrange them in a circular pattern around a central frame. Or go linear if that’s your vibe.
Here’s the cool part…
Leave the cans in their original state. Those brand colors and markings? That’s authentic street-style character right there.
This chandelier belongs in creative studios. Teen bedrooms. Modern entertainment spaces.
People always ask about it. Always.

3 Kitchen Strainer Light Fixture
I stumbled onto this idea by accident.
I was organizing my kitchen one day, and a colander caught the light just right. Those perforated holes created the most beautiful pattern on my wall.
And I thought… why not turn this into a pendant light?
The beauty of this project?
The holes are already there. No extra work needed. Just grab a metal colander or strainer and attach a pendant light kit through the drainage holes.
That’s it.
No drilling. No complicated modifications. The reflective interior bounces light beautifully around your room.
For modern spaces, go with stainless steel. Want farmhouse charm? Find a vintage enamel strainer.
You can finish this project in under 30 minutes. It costs less than $20. And it looks like you paid way more.
Hang it over a breakfast nook. Or group several together for visual interest.

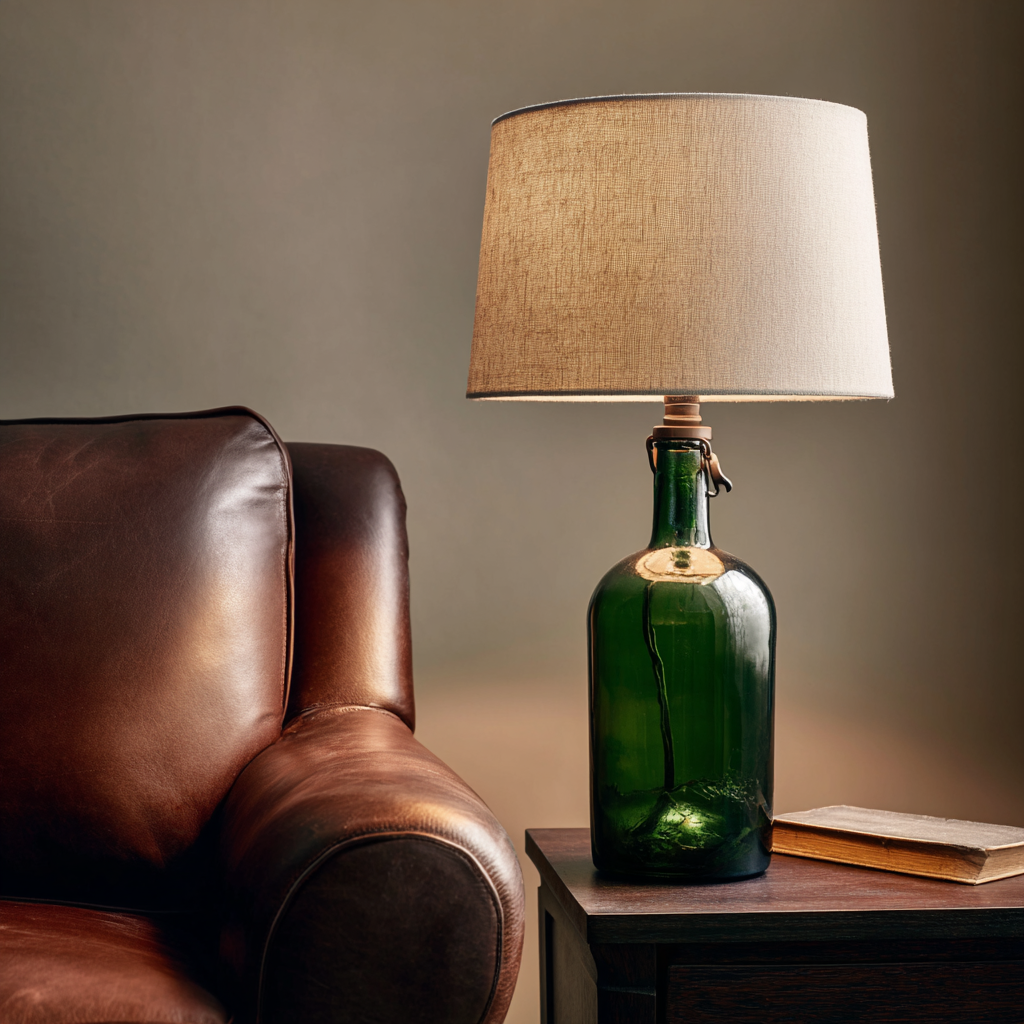
4 Wine Bottle Table Lamp
I save wine bottles from special occasions. Always have.
My sister’s wedding. My 30th birthday. That random Tuesday when I got promoted.
Now they’re not just sitting in a closet collecting dust. They’re gorgeous table lamps that remind me of those moments every single day.
The colored glass? It creates this warm, ambient glow that’s perfect for cozy evenings.
Here’s the process:
Clean your bottles thoroughly. Get those labels off for a sleek look. Then drill a hole near the bottom using a glass drill bit. (Yes, you need the right bit for this.)
Insert a bottle lamp kit from any craft store. They’re super cheap.
Want to get fancy? Fill the bottle partially with fairy lights. Or decorative stones. Colored sand works beautifully too.
Quick tip: Green and amber bottles look stunning in traditional spaces. Clear glass fits modern aesthetics better.
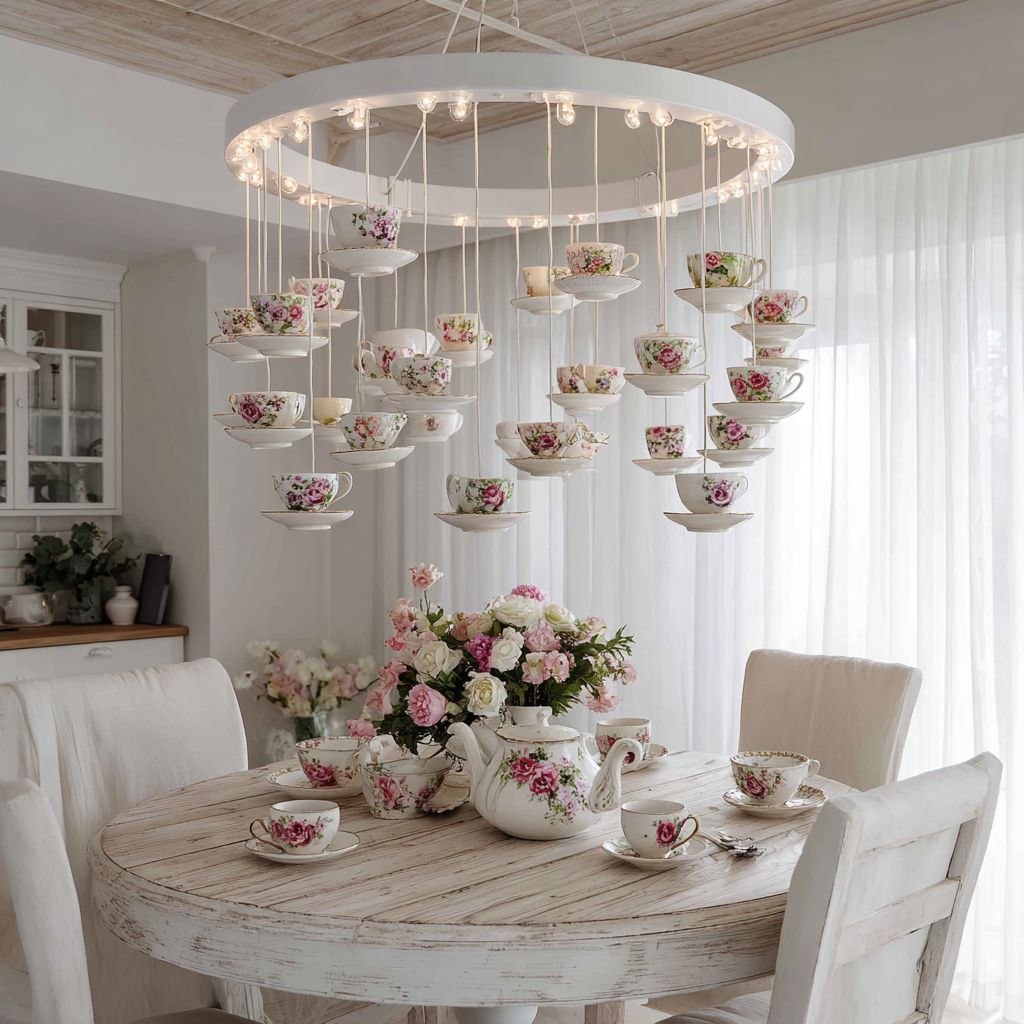
5 Teacup Chandelier Creation
My grandmother left me her mismatched china collection when she passed.
I couldn’t bear to pack it away in boxes where no one would see it. These cups held so many memories – Sunday brunches, holiday dinners, quiet afternoons sipping tea together.
This project lets me honor those memories while actually using the pieces she loved.
The result?
A whimsical chandelier that adds cottage charm to any room.
You’ll need a diamond drill bit to make small holes in the bottom of each cup. Take your time with this part. Thread pendant cords through and secure them properly.
Then hang the teacups at different heights from a circular frame. Or go linear if you prefer.
Mix patterns and colors for an eclectic vibe. Or stick with matching sets for a more cohesive look.
The gentle clinking sound when air circulates? Pure magic.
This works wonderfully in breakfast rooms, shabby chic bedrooms, or reading corners.
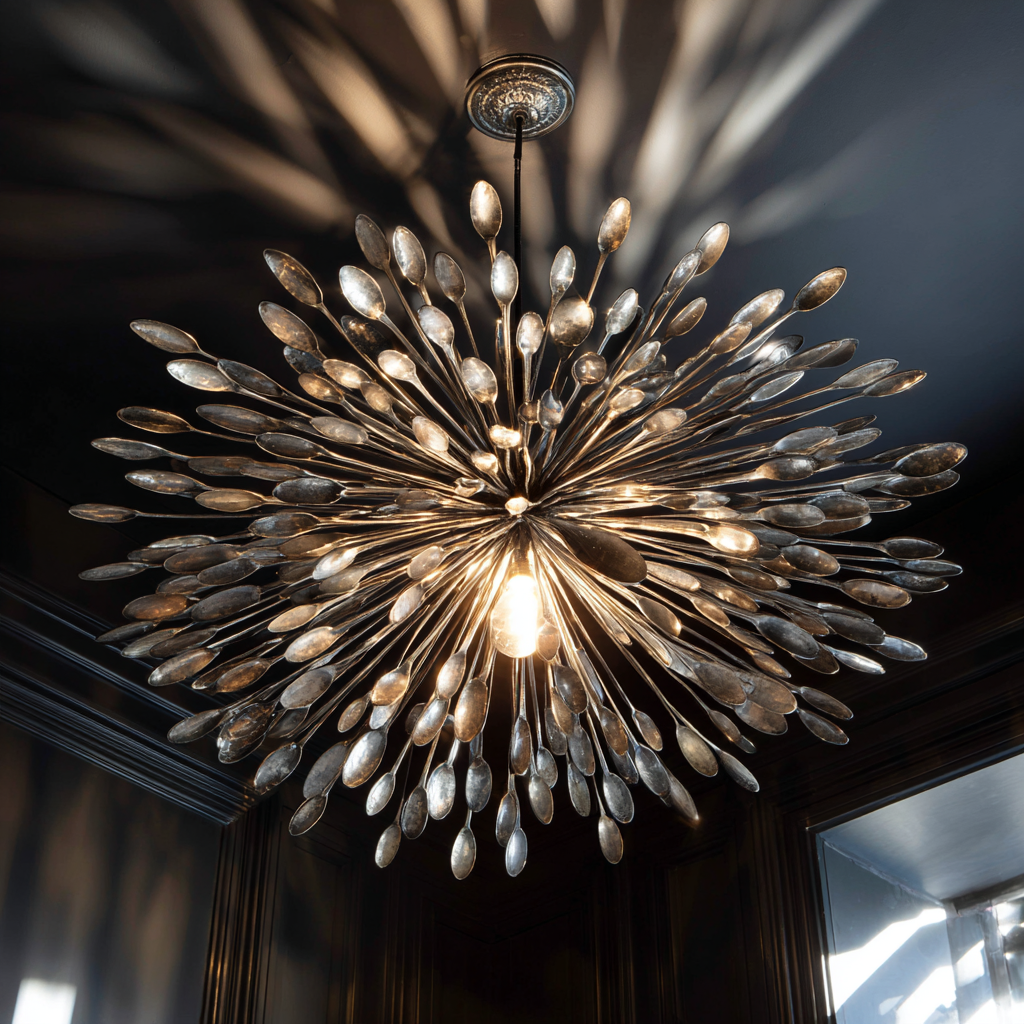
6 Upcycled Spoon Lampshade
I saw this at a flea market booth and literally stopped in my tracks.
The way light danced through those vintage spoons? Mesmerizing. The reflective surfaces created patterns that changed throughout the day.
I went home and made one immediately.
Here’s what you need:
Hit up thrift stores and yard sales for old spoons. The more tarnished and vintage, the better. Bend the handles slightly to add dimension.
Now attach them to a wire frame sphere. You can use strong adhesive or wire wrapping – whatever you’re comfortable with.
Overlap them like scales. Or space them evenly. Both look incredible.
Polish the spoons for elegant shine. Or leave them tarnished for vintage character. I prefer the tarnished look, personally.
This project takes patience. I won’t lie. But the results? Spectacular.
Perfect for dining rooms, entryways, or above kitchen islands.
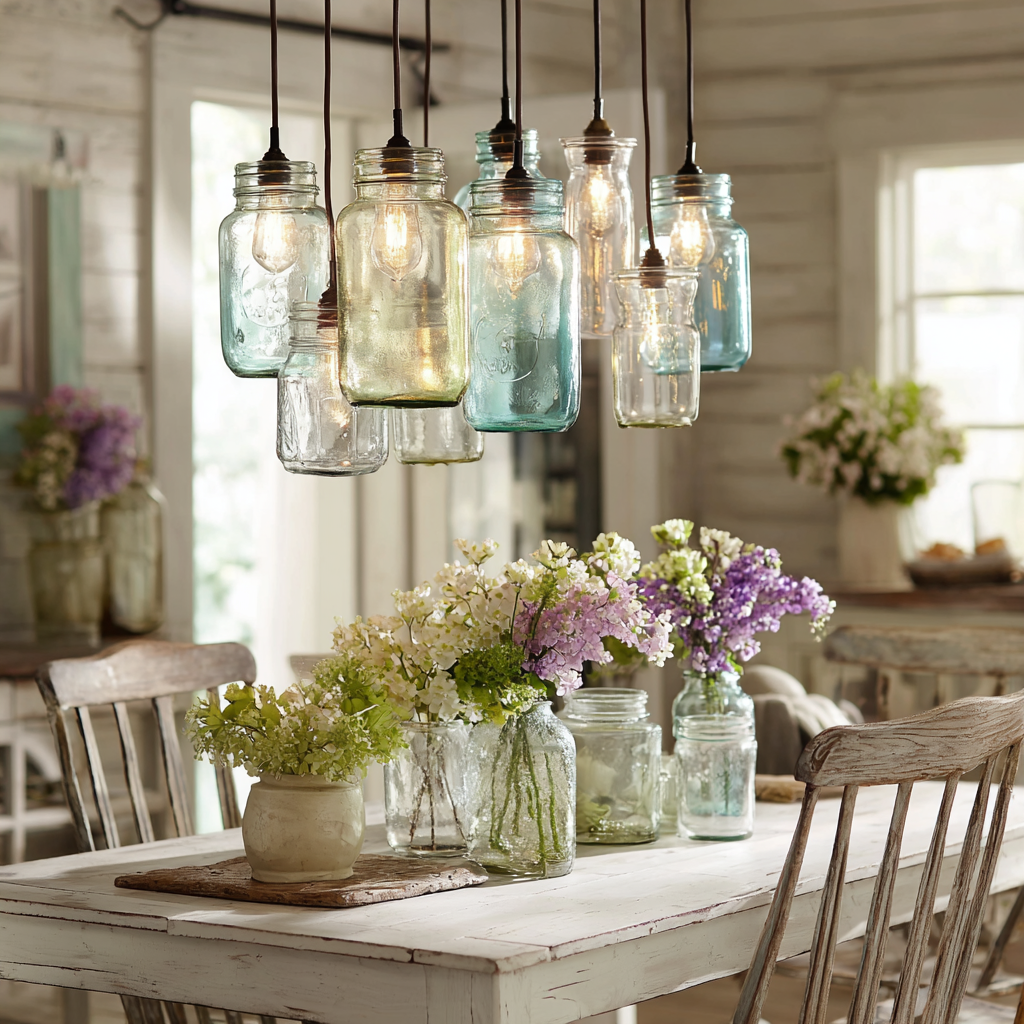
7 Mason Jar Pendant Cluster
I’ve made dozens of mason jar lights over the years.
They never go out of style. Ever.
The clear glass showcases Edison bulbs beautifully. And that farmhouse aesthetic? People can’t get enough of it.
You can buy pendant light kits made specifically for mason jars. They’re everywhere now. Or create your own custom solution if you’re feeling adventurous.
Pro tip: Wide-mouth jars are easier to work with. Changing bulbs is way simpler.
Cluster multiple jars at different heights for drama. Try using blue or amber vintage jars for colored light effects.
Want industrial flair? Wrap jute rope around the jar necks. Or add metal cage protectors.
These fixtures work perfectly above farmhouse tables. Kitchen islands. Even covered outdoor spaces.
The materials are affordable. This is accessible for any budget.
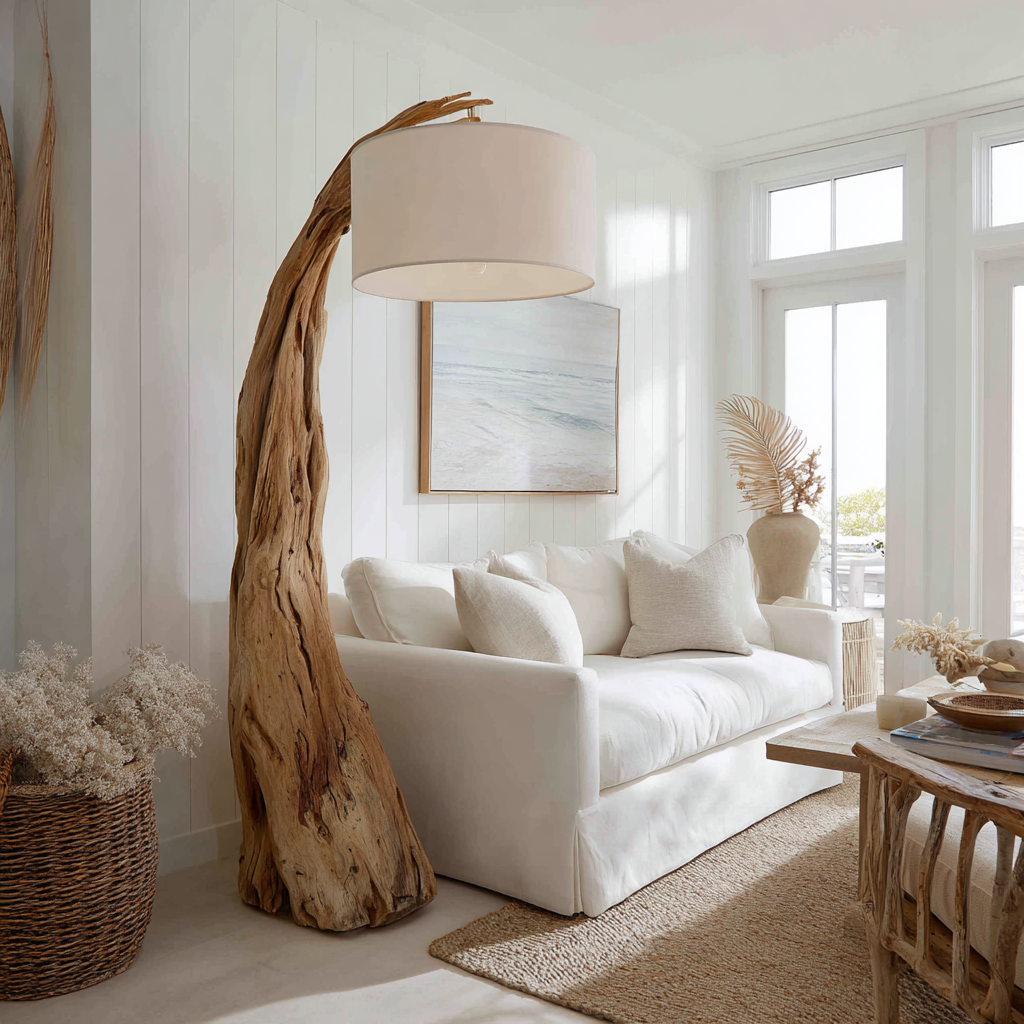
8 Driftwood Floor Lamp
Every piece of driftwood in my home tells a story.
This one’s from Cape Cod. That one’s from our anniversary trip to California. Each lamp holds vacation memories that make me smile.
The natural curves and silvery patina? They’re like organic sculptures that happen to give you light.
Find a substantial piece with interesting shape. Make sure it’s stable. Sand down any rough edges, but keep that weathered character intact.
You’ll need to drill holes for wiring. Use the right bits for this.
Then attach a simple shade. I recommend linen or burlap. Nothing fancy. Let the wood be the star.
Safety note: Secure the base properly, especially with tall pieces. We don’t want this tipping over.
These lamps work beautifully in coastal homes. Scandinavian interiors. Minimalist spaces.
And here’s the thing – you’ll never see another one exactly like yours. It’s truly one-of-a-kind.
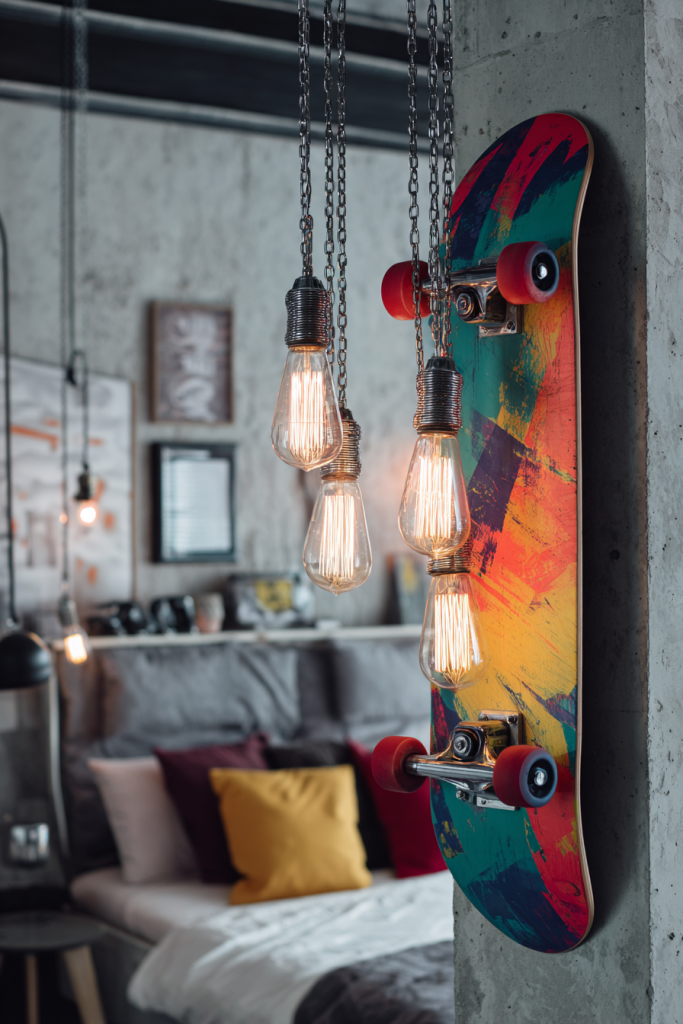
9 Skateboard Deck Hanging Light
My nephew outgrew his skateboard phase.
Those worn decks were headed to the trash. But I saw the vibrant graphics and thought… these tell stories of adventures, scraped knees, and growing up.
Why not give them new life?
This project is perfect for teen rooms or creative spaces. The edgy vibe appeals to anyone who appreciates street culture.
Remove the wheels and trucks. Drill holes along the length for pendant cords – space them evenly.
Hang the deck horizontally using sturdy chains or cables. Attach multiple pendant lights beneath it.
The colorful graphics add personality. You don’t need any additional decoration.
This works great above pool tables. Workbenches. Game rooms.
Quick tip: Use LED bulbs. They won’t damage the deck’s graphics with heat.
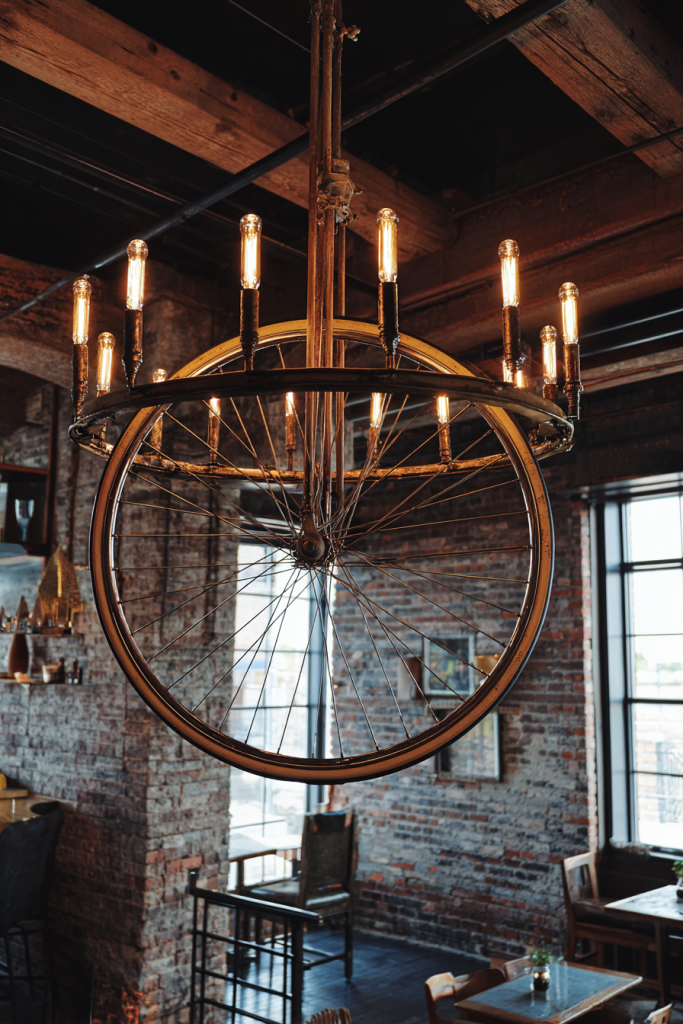
10 Vintage Bicycle Wheel Chandelier
I found my first wheel at an estate sale for five bucks.
The seller thought it was junk. But I saw its sculptural potential immediately. Those spokes create the most beautiful geometric shadows when lit up.
This is industrial design at its finest.
Clean the wheel thoroughly. Remove the tire completely. You can polish the metal spokes or paint the whole thing in your preferred finish.
Attach pendant lights around the rim at equal intervals. Then suspend it from your ceiling using chains that match your decor style.
This chandelier works wonders in high-ceiling spaces. Loft apartments. Industrial-themed rooms.
Even when the lights are off, the circular symmetry provides architectural interest.
Leave the original patina for authentic vintage character. That weathered look is chef’s kiss.
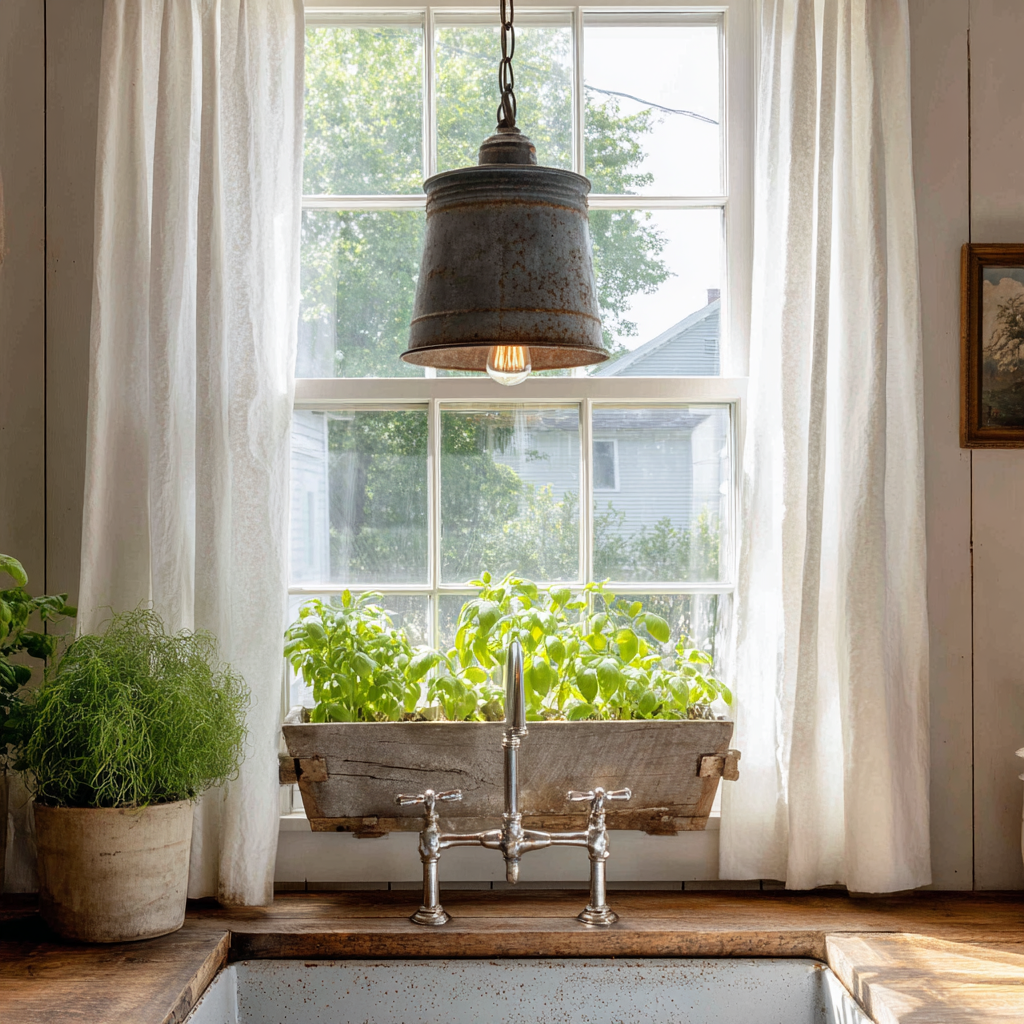
11 Galvanized Bucket Pendant Light
Barn sales are treasure troves.
I found these metal buckets just sitting there, and immediately pictured them hanging in my kitchen. The rustic patina. Those authentic handles. You can’t fake that character.
New fixtures from stores? They try to replicate this look. But it’s never the same.
Drill a hole in the bucket bottom for your pendant cord. Clean it thoroughly, but keep that weathered finish. That’s where the charm lives.
Hang it upside down with the opening facing down. The metal reflects light efficiently while that vintage finish adds warmth.
Designer trick: Use buckets in different sizes grouped together. The dynamic visual interest is incredible.
These belong in mudrooms. Laundry spaces. Country kitchens.
The industrial-farmhouse crossover makes them incredibly versatile.
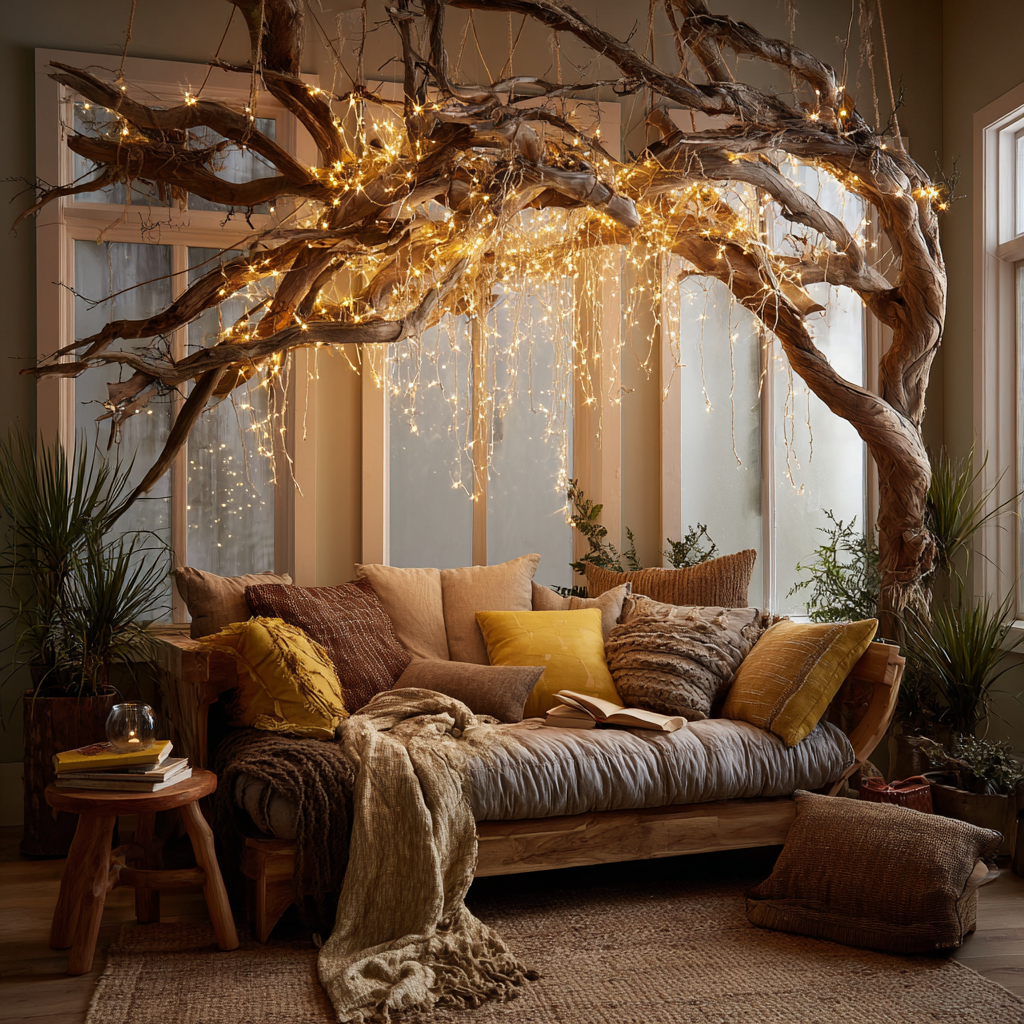
12 Natural Twig Branch Chandelier
I collect interesting branches during autumn walks.
It started as just something I did while hiking. But now each piece becomes a nature-inspired chandelier. The irregular shapes and textures? You can’t manufacture that.
Select sturdy branches with curves and character. Clean them thoroughly. Let them dry completely – this is important.
Arrange them in a circular or horizontal pattern. Secure everything with wire or natural twine.
Now for the lighting…
Wrap string lights throughout. Or attach small pendant fixtures between the branches. Both approaches look magical.
This rustic lighting belongs in cabins. Nature-themed nurseries. Bohemian bedrooms.
The soft, filtered light feels inviting in a way that’s hard to describe. It just works.
Add preserved moss for extra woodland charm. Or tiny artificial birds if you’re feeling whimsical.
13 Clustered Glass Jar Chandelier
My jar collection started innocently enough.
One from an antique shop. Another from a flea market. Each one had unique shapes or colored glass that caught my eye.
Before I knew it, I had dozens. And a brilliant idea.
These mismatched jars create stunning chandeliers with serious vintage appeal. Each jar adds its own character while contributing to the overall design.
Gather jars in complementary sizes, shapes, and colors. Drill holes in the lids for pendant cords. Or grab jar pendant conversion kits if you want the easy route.
Arrange them at different heights from a wooden or metal base. Mix clear glass with colored options for dimension.
The varied glass creates interesting light refraction. Shadow patterns that change throughout the day.
Try using different bulb types within each jar. Layered lighting effects are stunning.
This eclectic approach shines in farmhouse kitchens. Craft rooms. Vintage-inspired dining spaces.
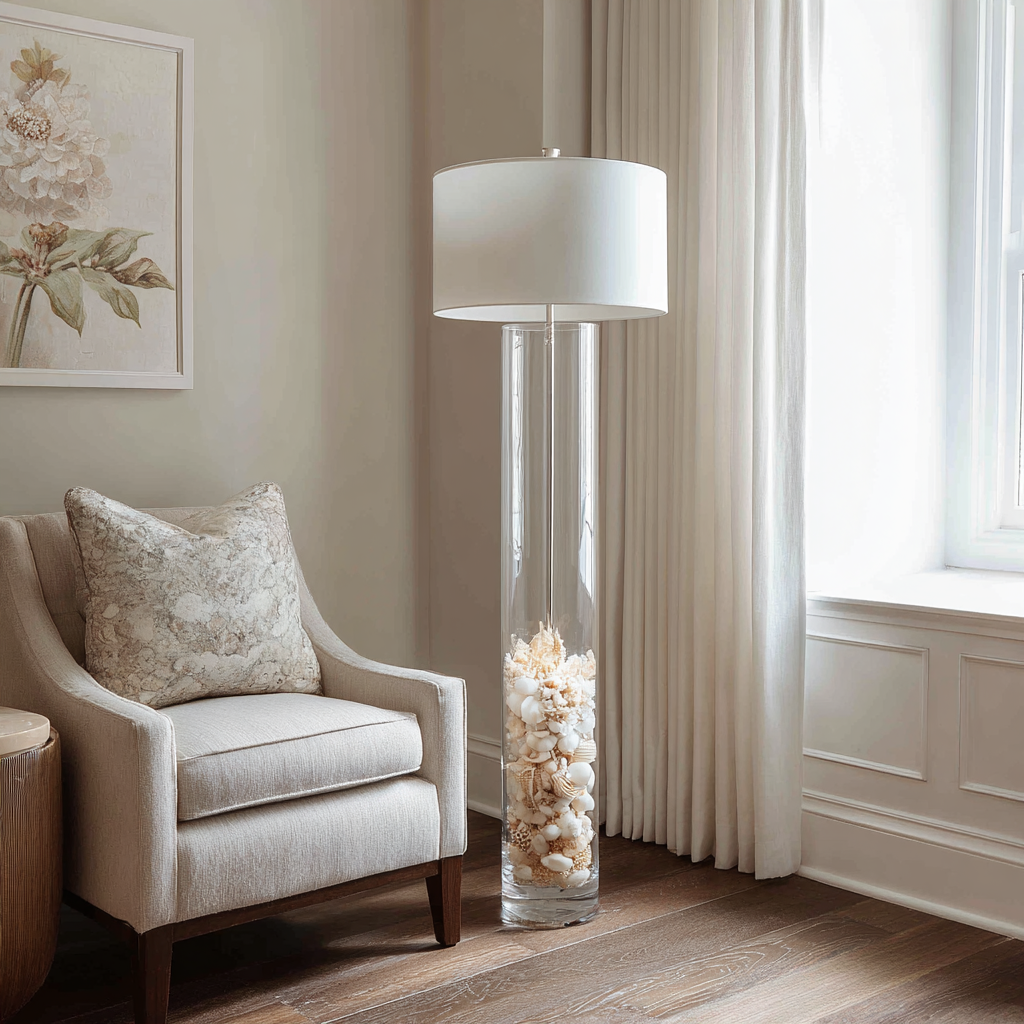
14 Tall Glass Vase Floor Lamp
I found a cracked vase at a clearance sale for three dollars.
Most people walked right past it. But I saw potential. That transparency allows for creative filling options while keeping clean, modern lines.
Choose vases with stable, wide bases. Safety first.
Thread your lamp cord through the opening. Secure it at the bottom. Then comes the fun part – filling it.
Sand and shells for coastal vibes. Preserved botanicals for natural elegance. Colored stones for pop. Whatever matches your color scheme.
Top it with a simple drum shade in neutral tones.
The vertical design draws eyes upward. Works wonderfully in corners or beside sofas.
Glass reflects surrounding colors beautifully. This means your lamp adapts as you change your decor. The see-through quality keeps spaces feeling open and airy.
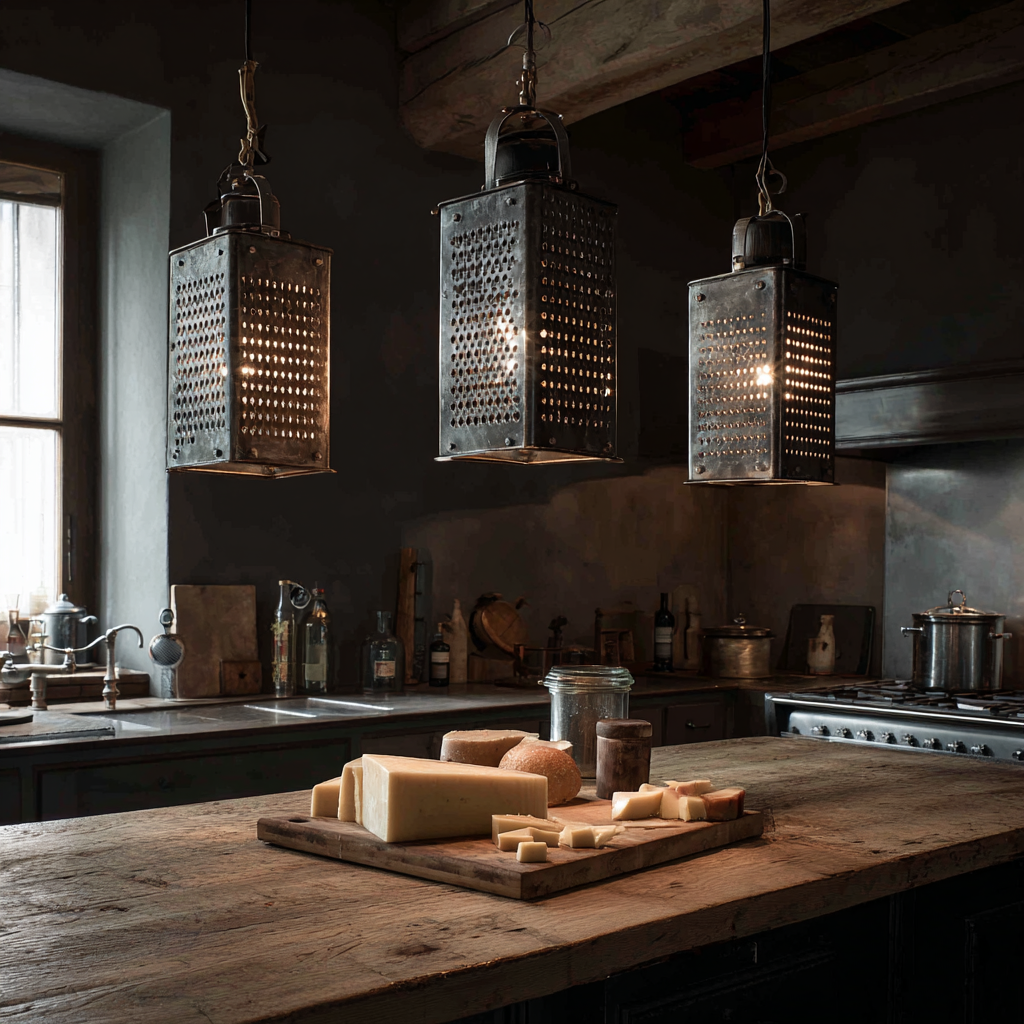
15 Suspended Grater Pendant Light
I tested this idea on a whim one Saturday afternoon.
The way that perforated surface diffused light? I couldn’t believe it. The rustic metal combined with functional design history makes one compelling conversation piece.
Guests always ask about these.
Find box graters or flat graters with interesting hole patterns. Clean them thoroughly. Remove any rust spots you find.
You might need to drill holes for hanging wire. Or the existing holes might work. Depends on your grater.
Suspend them at varying heights above counters or dining tables. The existing perforations create beautiful dappled light effects naturally.
Leave graters in their original finish for authentic vintage charm. Or spray paint them in modern colors – matte black looks incredible.
These excel in industrial kitchens. Eclectic dining rooms. Creative studio spaces.
The unexpected material choice delights guests every single time.
16 Yardstick Lampshade Frame
I inherited my grandfather’s measuring stick collection.
He was a carpenter. Those sticks measured countless projects over decades. I wanted to display them functionally while honoring his memory.
The numbers and weathered markings add mathematical interest. Historical charm too.
Collect six to eight yardsticks in similar condition. Arrange them vertically around a wire frame. Create a cylindrical or hexagonal shape – your choice.
Secure everything with strong adhesive or small screws at top and bottom. Leave gaps between sticks so light filters through attractively.
This works beautifully as table lamp shades. Or pendant light covers.
The neutral wood tone complements virtually any color scheme. Adds texture and dimension too.
The vintage ruler aesthetic? Perfect for offices. Craft rooms. Masculine spaces.
Wrapping It Up
Here’s what I’ve learned from all these projects…
Sustainable design doesn’t mean sacrificing beauty. Or style. Or personality.
These 16 DIY lamp ideas prove that everyday objects can become extraordinary. You just need to look at them differently.
The beauty of upcycled lighting?
No two pieces will ever be exactly alike. Your home reflects your individual style. Not what some designer thinks should be trendy this season.
Start with projects that match your skill level. Don’t jump into the deep end if you’ve never done this before.
Many of these require minimal tools. You can complete them in single afternoons. And the satisfaction of lighting your home with something you created yourself? There’s nothing quite like it.
Remember – lighting dramatically impacts how a room feels. Consider your existing decor. Ceiling height. Natural light. All of it matters.
Don’t be afraid to experiment. Try different materials. Play with colors. Mix and match arrangements until something clicks.
These DIY lighting solutions prove that creativity and sustainability go hand in hand beautifully.
Now go make something amazing.
Frequently Asked Questions
How much does it typically cost to create DIY lamp fixtures?
Most projects run between $15 and $50.
It depends on materials and electrical components you need. The household items themselves? Often free. Or dirt cheap from thrift stores.
Pendant light kits cost $10 to $25 at hardware stores. Not bad at all.
Specialty bulbs like Edison filament types add $10 to $15 per bulb. Still way cheaper than buying finished fixtures.
Overall?
DIY fixtures cost 70-80% less than comparable retail lighting. And they’re completely unique. You can’t put a price on that.
Do I need special electrical knowledge to make DIY lamps?
Basic projects require minimal electrical knowledge.
Especially when you’re using pre-wired pendant kits. These kits include everything you need with simple instructions.
Here’s the deal though…
Always turn off power at the circuit breaker when installing overhead fixtures. Safety first. Always.
If you’re uncomfortable with electrical work? Hire a licensed electrician for final installation. It’s worth the peace of mind.
Many projects just involve inserting bulbs into ready-made sockets. No wiring skills needed at all.
What safety considerations should I keep in mind?
Always use LED bulbs in enclosed fixtures.
Why? They prevent heat buildup and fire hazards. This is non-negotiable.
Make sure all materials are clean. Free from flammable residues before installation.
Verify that hanging fixtures are securely mounted. Use ceiling joists or appropriate anchors. We don’t want anything falling on someone’s head.
Keep flammable materials away from hot bulbs. Paper, fabric, anything that can catch fire.
Use appropriate wattage bulbs as specified by your light kits. Don’t exceed those recommendations.
When in doubt about structural support or electrical connections? Consult professionals. Better safe than sorry.
Can these DIY lighting fixtures work in rental properties?
Absolutely.
Many projects work perfectly in rentals without permanent modifications.
Plug-in pendant lights require zero ceiling alterations. They just hang from existing hooks. Easy.
Table lamps and floor lamps? No installation whatsoever. Plug them in and you’re done.
For overhead fixtures, use temporary solutions like swag hooks. They leave minimal holes.
Always check your lease agreement though. Some landlords are picky about lighting modifications.
Keep your original fixtures safe. Reinstall them before moving out. This ensures you get your security deposit back.
The good news?
Most of these projects are completely reversible. You can take your custom lighting with you to your next place.