
I’ll never forget the day I couldn’t find my drill in my garage. It was buried somewhere under camping gear, holiday decorations, and who knows what else. That frustrating moment sparked my journey into garage organization, and I haven’t looked back since.
Your garage deserves to be more than a dumping ground for everything that doesn’t fit inside your home. With strategic DIY organization projects, you can transform this cluttered space into a functional workshop, storage haven, and maybe even a place where your car actually fits. The best part is that most garage organization solutions don’t require professional help or expensive systems.
I’ve discovered that organizing your garage is about maximizing vertical space, creating designated zones, and implementing smart storage solutions. From simple pegboard installations to creative overhead racks, these DIY projects work with any budget and skill level. You’ll reclaim valuable floor space while making everything easily accessible.
In this article, I’m sharing fifteen practical garage organization DIY projects that have completely changed how I use my space. Each project includes clear instructions, material suggestions, and tips I’ve learned through trial and error. Whether you’re tackling a single-car garage or a spacious three-car setup, these ideas will help you create an organized, efficient space that actually makes you want to spend time in your garage.
Ready to transform your cluttered garage? Let’s dive into these game-changing organization solutions!
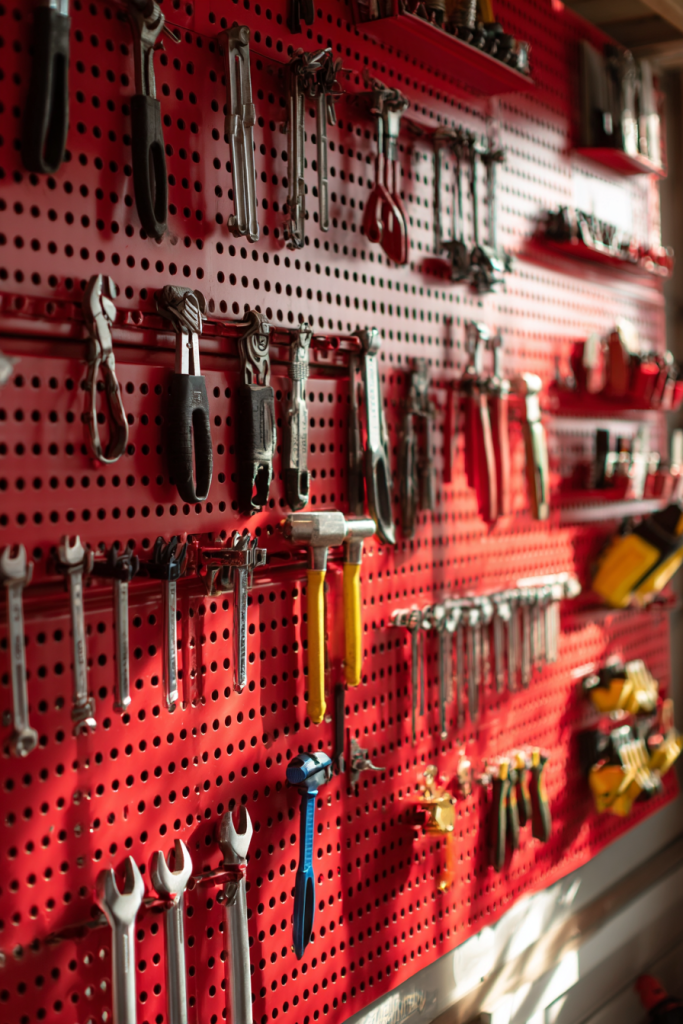
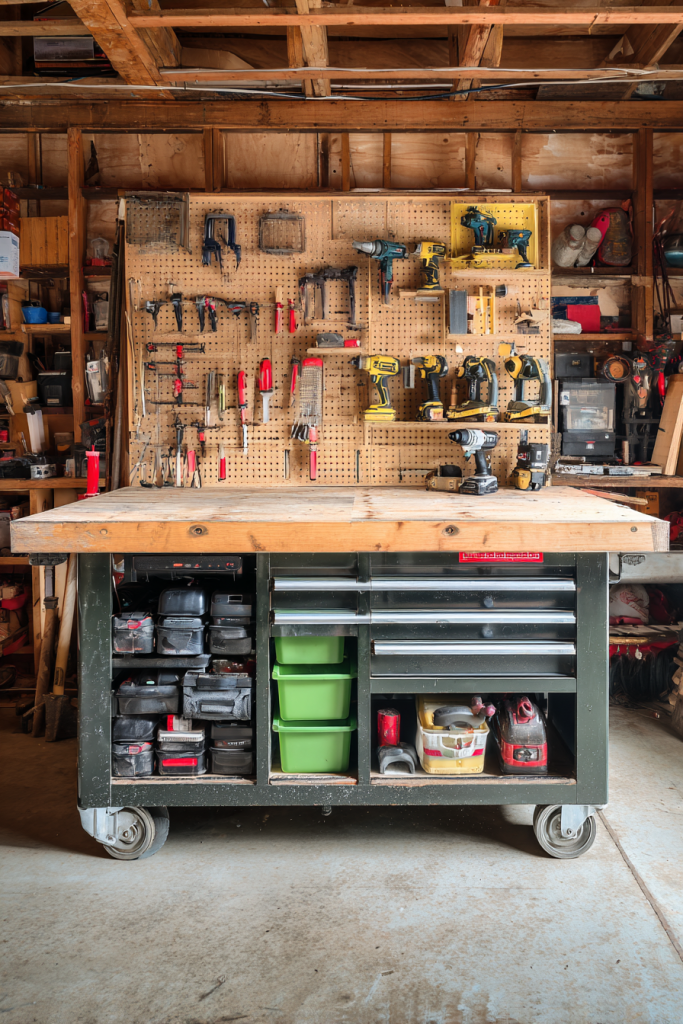
1. Wall-Mounted Pegboard Tool Organizer
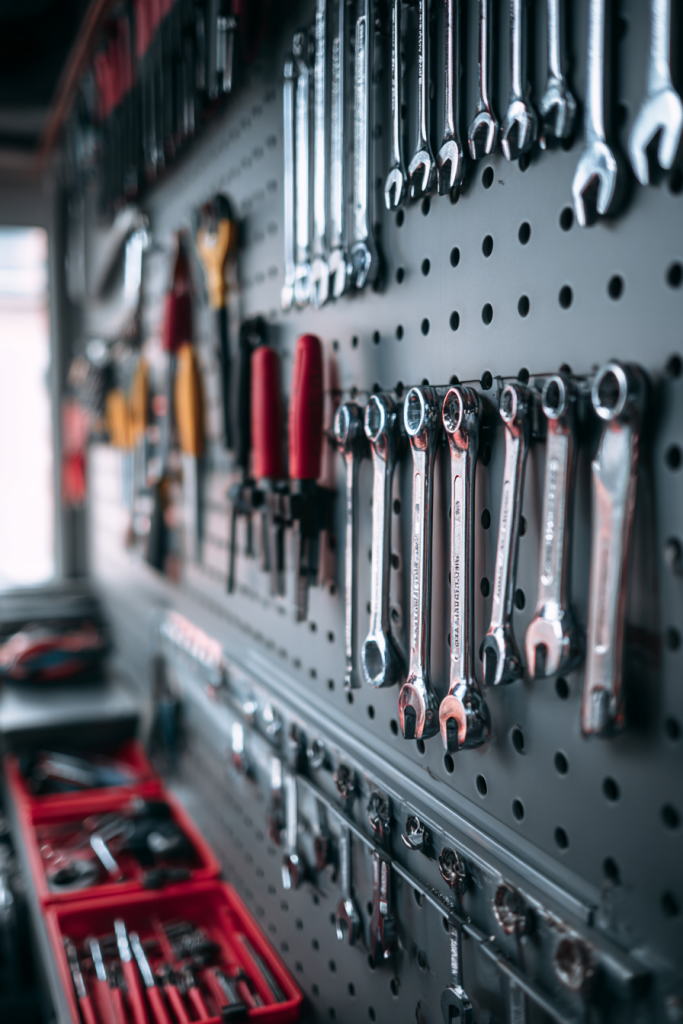
Creating a wall-mounted pegboard system is hands-down the most versatile garage organization solution I’ve implemented. This classic approach keeps all your hand tools visible and within arm’s reach. Choose a sturdy quarter-inch pegboard and mount it securely to wall studs using furring strips for stability. Paint the pegboard in a bold color like red or navy to add visual interest while making tools easier to spot. Use a variety of hook styles including J-hooks for hammers, double hooks for levels, and basket attachments for small items. Arrange your most-used tools at eye level and group similar items together. The beauty of pegboard is its flexibility; you can rearrange hooks as your tool collection grows. Add a small shelf above the pegboard for storing frequently used supplies like screws and nails.
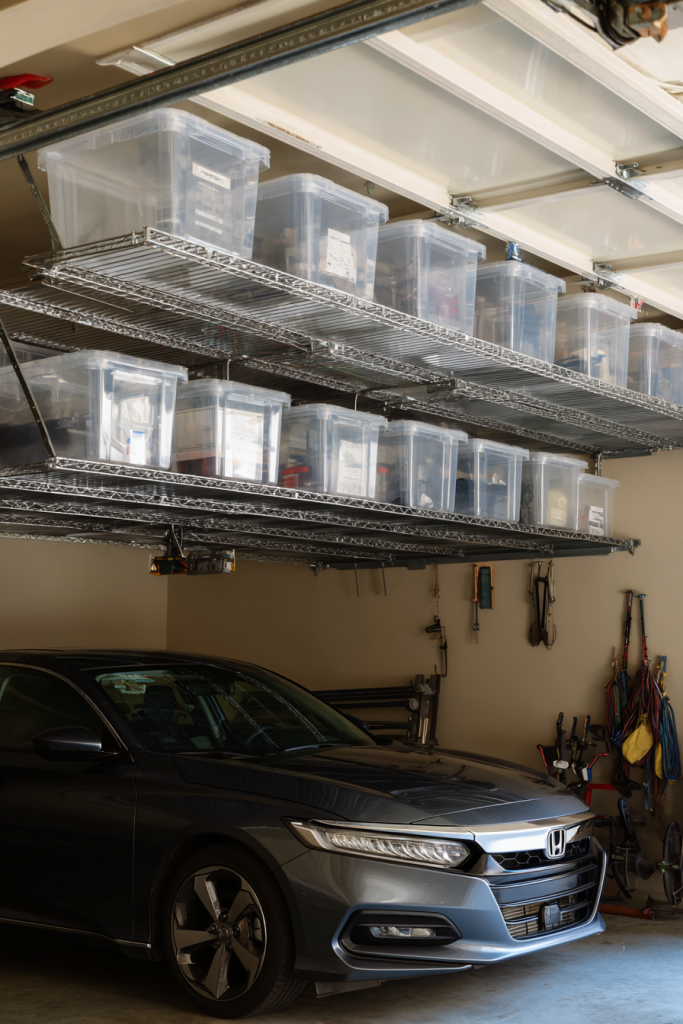
2. Ceiling-Mounted Overhead Storage Racks
When floor space runs out, look up! Overhead storage racks completely changed my garage by utilizing that wasted ceiling space. These heavy-duty racks attach directly to ceiling joists and can hold seasonal decorations, camping gear, and storage bins. I recommend racks that adjust from 22 to 40 inches from the ceiling for maximum flexibility. Measure your garage door’s arc carefully to avoid interference when opening and closing. Install the racks above your car’s hood or trunk area where you rarely walk. Use clear plastic bins so you can identify contents without climbing a ladder. Label each bin on multiple sides for easy identification. This system works perfectly for items you need only occasionally, keeping them accessible yet out of your daily workflow.
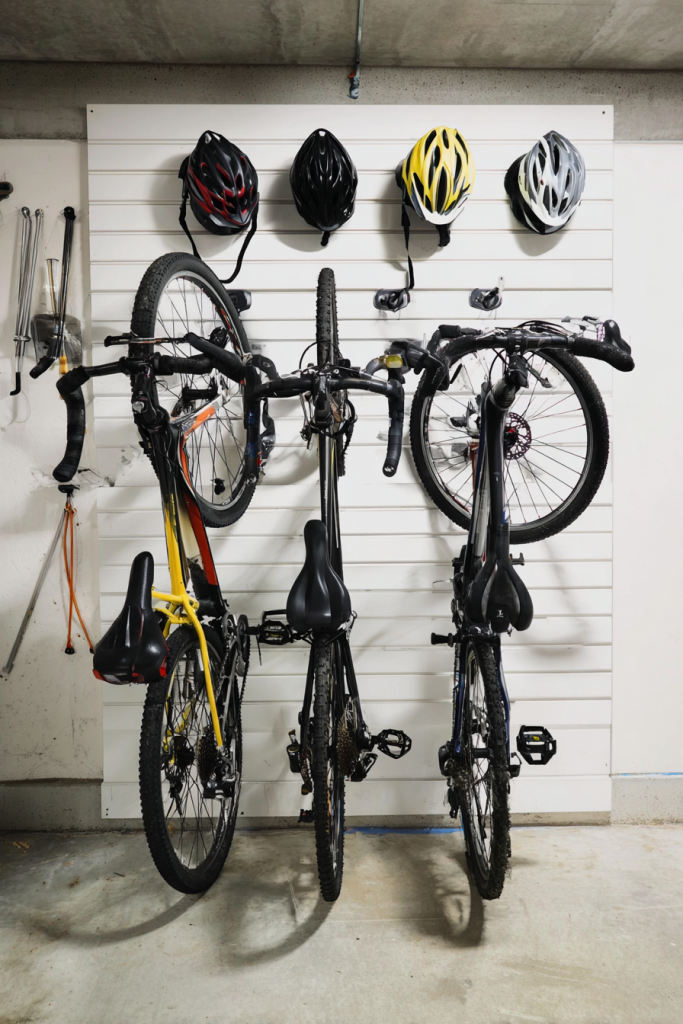
3. Custom Vertical Bike Storage Rack
Bikes scattered across the garage floor drive me crazy, so I built a vertical bike rack that stores them upright against the wall. This DIY solution uses simple materials like two-by-fours and bike hooks. Mount a horizontal board at wheel height and another at handlebar height. Install rubber-coated hooks that cradle the front wheel without damaging the tire. Space the hooks 18 inches apart to accommodate different bike sizes. This vertical storage method works brilliantly for families with multiple bikes. Add small hooks nearby for helmets, locks, and bike accessories to create a complete cycling station. The entire setup takes only a few hours and costs less than $30. Your bikes stay protected while freeing up valuable floor space.
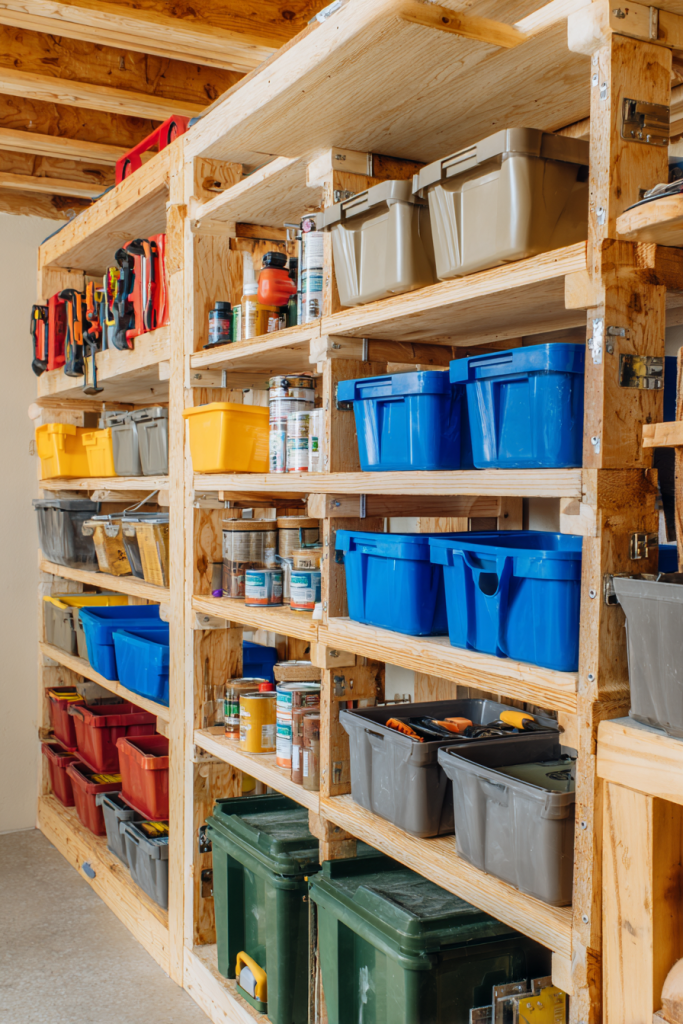
4. Modular Shelving Units with Adjustable Heights
Building custom modular shelving units allows you to design storage that perfectly fits your garage dimensions and needs. I used three-quarter-inch plywood and heavy-duty metal brackets rated for 500 pounds per shelf. Create shelves in varying heights to accommodate everything from paint cans to large storage bins. The bottom shelf should sit about 12 inches off the floor to prevent moisture damage. Middle shelves work best at 18-inch intervals for standard storage bins. Reserve top shelves for lightweight seasonal items you access infrequently. Seal the wood with polyurethane to protect against moisture and temperature fluctuations. Add drawer slides to one section for pull-out shelves that make accessing deep storage easier. This customizable approach ensures every inch of wall space works efficiently.
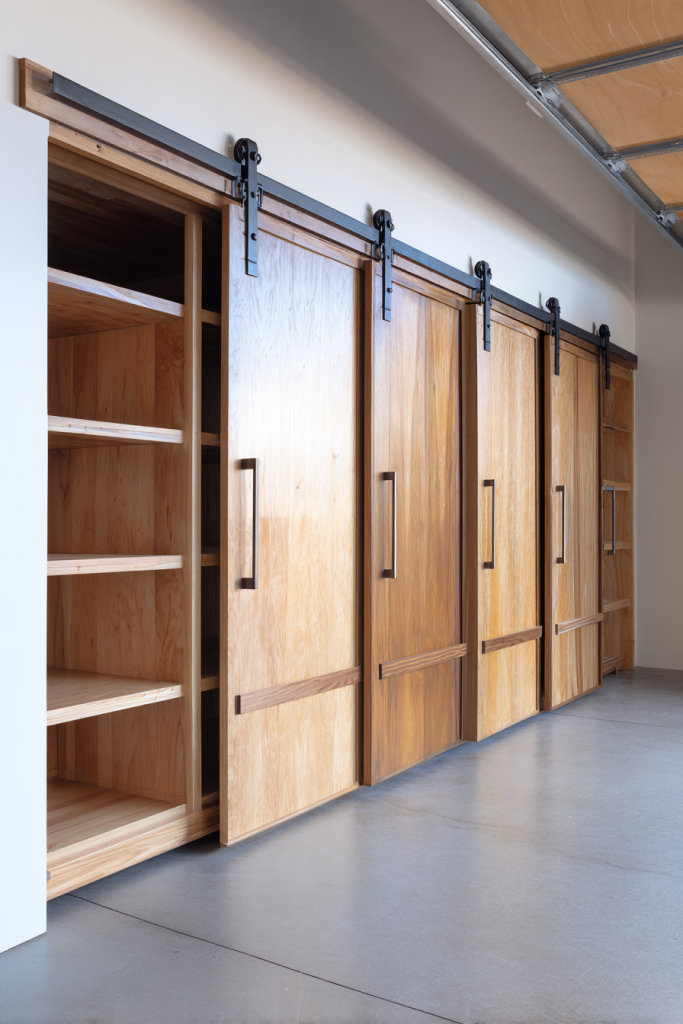
5. Rolling Panel Storage System
A sliding panel storage system is my secret weapon for seasonal items that I need to rotate throughout the year. This clever system uses ceiling-mounted tracks and rolling panels that glide smoothly side to side. Install heavy-duty barn door hardware rated for the panel weight you’re planning. Build panels from three-quarter-inch plywood and add shelving or pegboard to the front surface. One panel can hold holiday decorations while another stores summer sports equipment. The sliding mechanism lets you access items stored behind other panels without moving everything around. This space-efficient solution works especially well in narrow garages where traditional shelving would block walkways. Paint each panel a different color to designate specific categories at a glance.
6. Mason Jar Storage Under Shelves
This clever under-shelf storage hack transforms unused space into organized small-parts storage. I collected mason jars in various sizes and screwed their lids to the underside of shelves or overhead beams. Fill jars with screws, nails, bolts, washers, and other small hardware that typically gets lost in drawers. Simply twist jars into the mounted lids for secure storage. The clear glass lets you identify contents instantly without labeling. This system keeps tiny items visible and prevents you from buying duplicates. Use smaller four-ounce jars for specialized items like picture hangers or wire nuts. Larger pint-sized jars work perfectly for bulk fasteners. This eco-friendly solution repurposes containers you already have while maximizing every available inch.

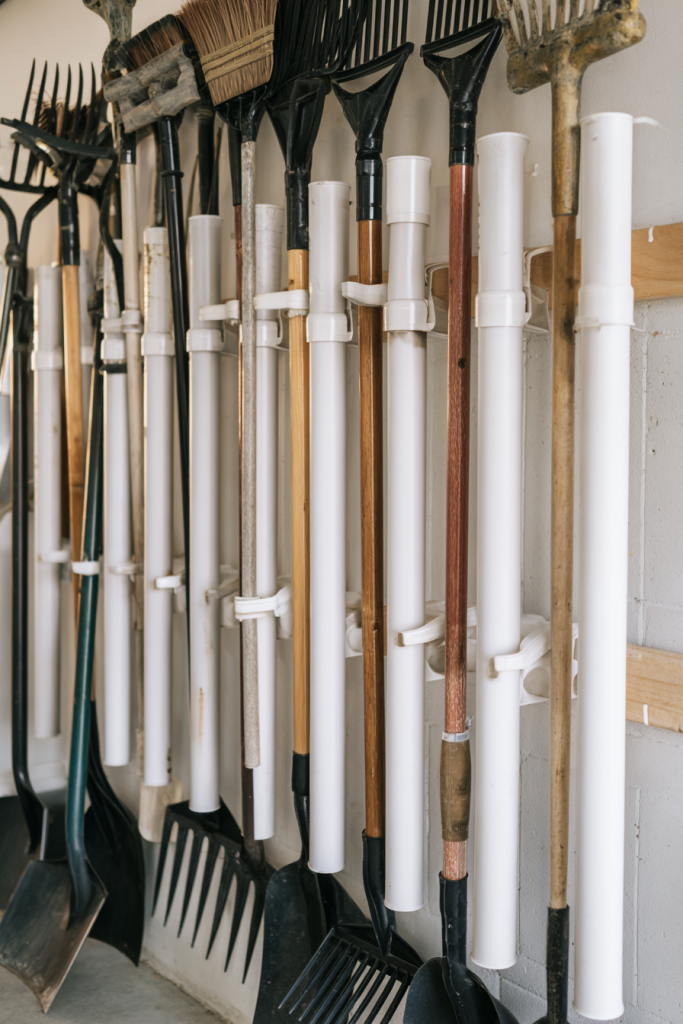
7. Long-Handle Tool Rack with PVC Pipes
Garden tools leaning precariously in corners used to be my garage nightmare until I built this simple PVC pipe organizer. Cut four-inch diameter PVC pipes into six-inch sections and mount them horizontally to a wall board. Space the pipes to accommodate your tool handles, typically every four to six inches. This system holds rakes, shovels, hoes, brooms, and other long-handled tools securely upright. The pipes prevent tools from falling over and damaging walls or cars. Mount the board at a comfortable height where you can easily slide tools in and out. Add labels above each section if you want designated spots for specific tools. This budget-friendly project costs less than $20 and takes about an hour to complete.
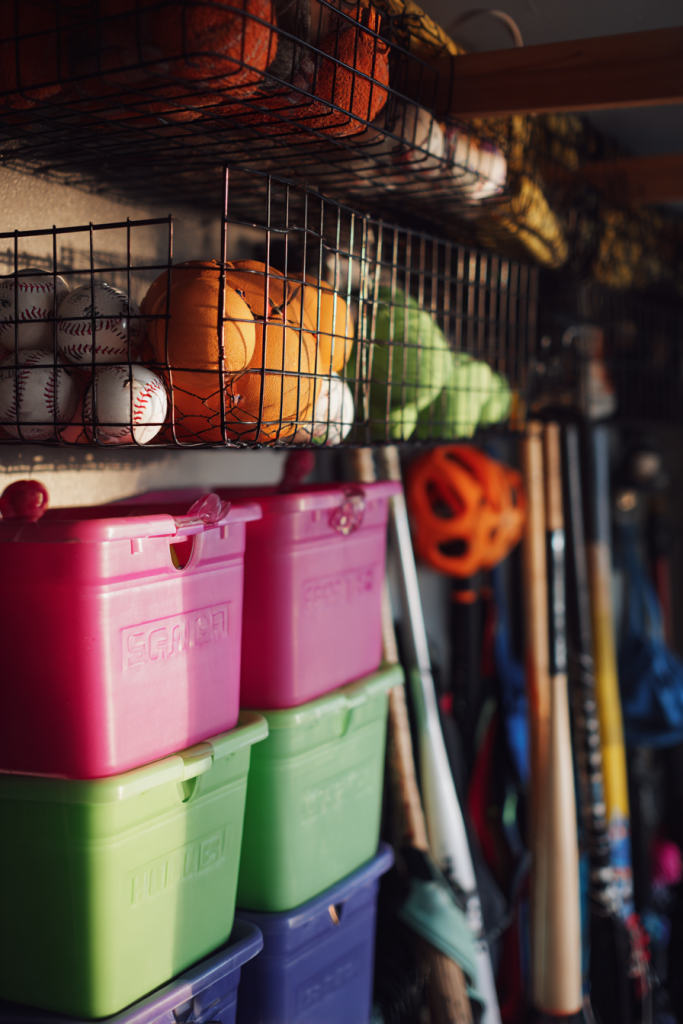
8. Sports Equipment Zone with Bins and Baskets
Creating a dedicated sports equipment zone brings order to the chaos of athletic gear. I built a custom storage unit with open cubbies sized for different equipment types. Use wire baskets for balls so they stay visible and air can circulate. Dedicate separate bins for each sport or family member using different colored containers. Mount hooks on the side for baseball bats, hockey sticks, and lacrosse equipment. Add a lower shelf for storing cleats and athletic shoes in clear shoe boxes. Install a small tension rod across one section for hanging jerseys and uniforms. Label everything clearly so kids can put equipment away independently. This centralized system means no more frantic searches before practice or games.
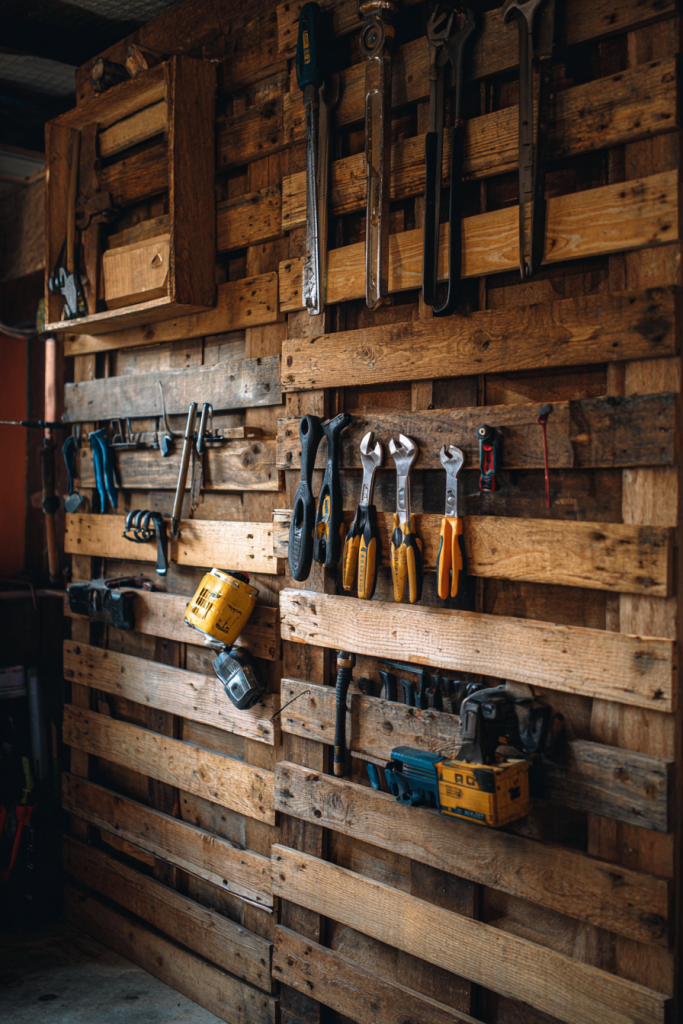
9. Reclaimed Wood Pallet Storage Wall
Wooden pallets offer an incredibly budget-friendly way to create rustic storage with loads of character. I sourced free pallets from local businesses and thoroughly cleaned them before mounting. Sand the pallets to remove splinters and apply a coat of sealant to prevent deterioration. Mount pallets horizontally to wall studs using heavy-duty lag bolts for maximum weight capacity. The natural slats create perfect slots for sliding in handled tools like brooms and garden implements. Add S-hooks between slats for hanging smaller items like extension cords and work gloves. You can also attach small shelves or baskets to the pallet front for additional storage. Paint or stain the pallets to match your garage aesthetic. This project combines functionality with industrial charm while keeping everything organized and accessible.
10. Mobile Workbench with Built-In Storage
A rolling workbench revolutionized my garage workspace by providing flexibility and organization in one unit. Build the frame using sturdy two-by-fours and top it with a solid hardwood work surface or butcher block. Install heavy-duty locking casters rated for at least 300 pounds to ensure stability. Add drawers underneath for storing hand tools and hardware using full-extension drawer slides. Include open shelving on one side for frequently used power tools. A pegboard back panel creates additional vertical storage for hanging tools. The mobility lets you position the workbench wherever you need it, then roll it against the wall when finished. This project requires intermediate woodworking skills but pays dividends in versatility and organization.
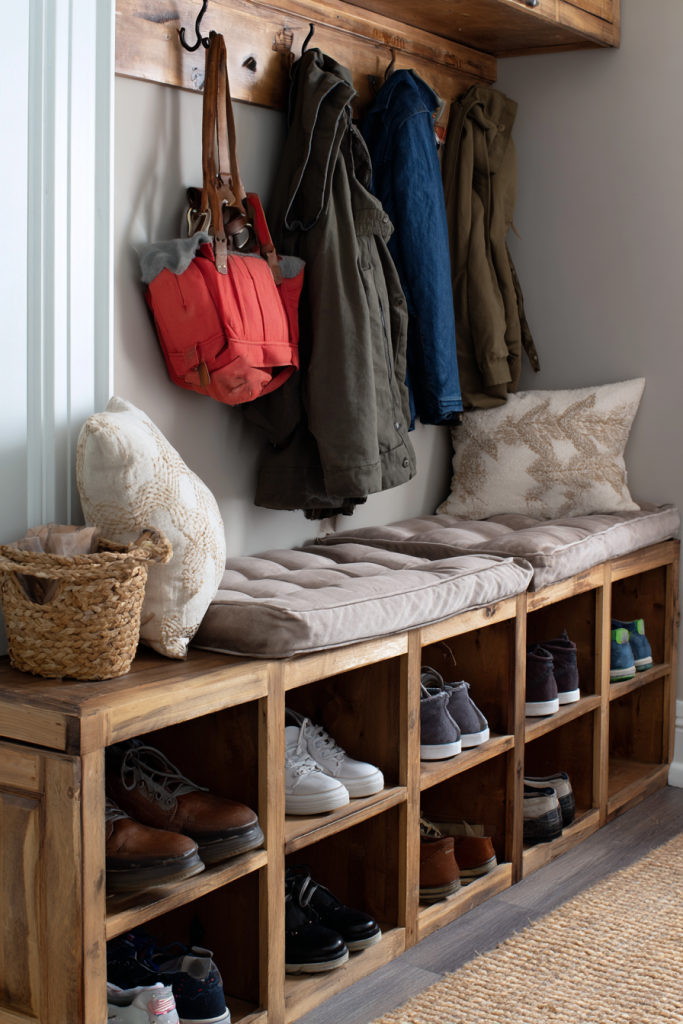
11. Entryway Shoe Storage Bench
A garage shoe bench serves double duty as seating and storage while keeping mudroom messes contained. Build a sturdy bench frame from two-by-fours with a plywood top for comfortable seating. Create cubbies underneath sized to fit adult shoes, approximately 12 inches wide and 6 inches tall. Add a waterproof cushion on top for comfort using outdoor fabric that wipes clean easily. Install hooks above the bench for coats, bags, and dog leashes to create a complete entry station. Paint the bench in a durable exterior paint that withstands dirt and moisture. This setup prevents dirt from tracking into your home while providing a convenient spot to change shoes. The cubbies keep footwear organized and off the garage floor.
12. Magnetic Strip Tool Holder
Installing magnetic tool strips transformed my messy tool drawer into a sleek, accessible system. Mount industrial-strength magnetic strips directly to walls near your workbench area for instant tool access. These strips hold metal tools like screwdrivers, pliers, wrenches, and scissors without any additional hardware. Arrange tools by size or frequency of use for maximum efficiency. The magnetic hold is strong enough that tools won’t fall even when bumped accidentally. I installed multiple strips at different heights to separate tool categories visually. This system eliminates rummaging through cluttered drawers and keeps sharp tools safely displayed. Clean the magnetic surface periodically to maintain holding strength. The minimalist look and instant accessibility make this my favorite quick organization upgrade.
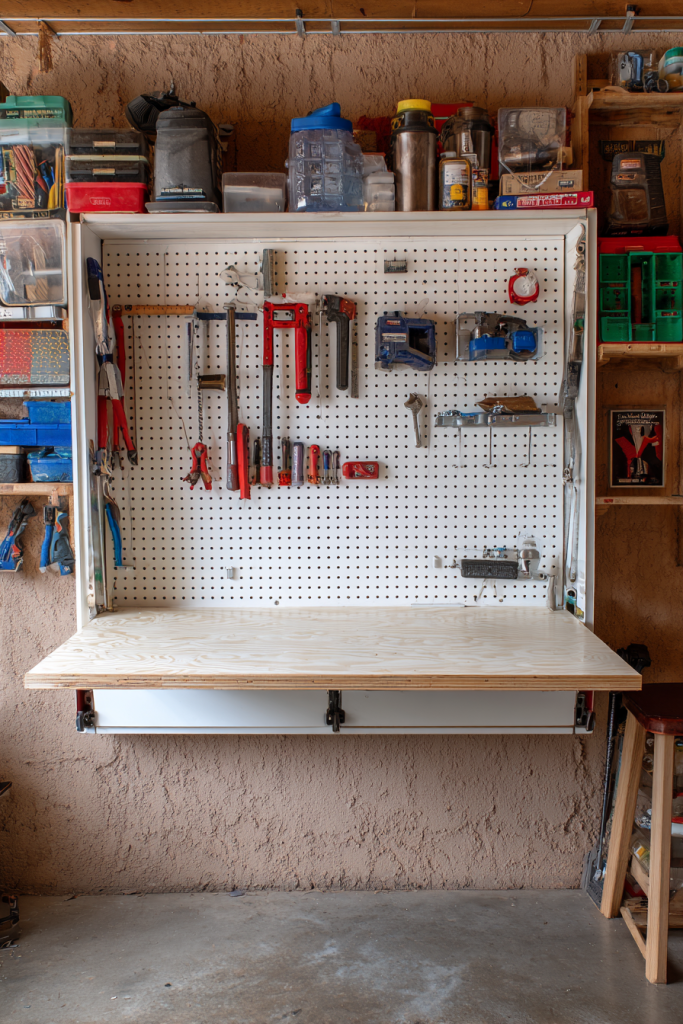
13. Wall-Mounted Folding Workbench
Space-challenged garages benefit enormously from a fold-down workbench that disappears when not needed. Build a sturdy table from three-quarter-inch plywood with a piano hinge attaching it to a wall-mounted frame. Install heavy-duty folding brackets that lock the table in horizontal position during use. The work surface should measure at least 24 inches deep and 48 inches wide for adequate workspace. Add a pegboard above the folding table to keep tools within reach during projects. When folded up, the entire unit is only four inches deep against the wall. Install at a comfortable 36-inch working height from the floor. This ingenious solution provides full workbench functionality without permanently consuming precious floor space.
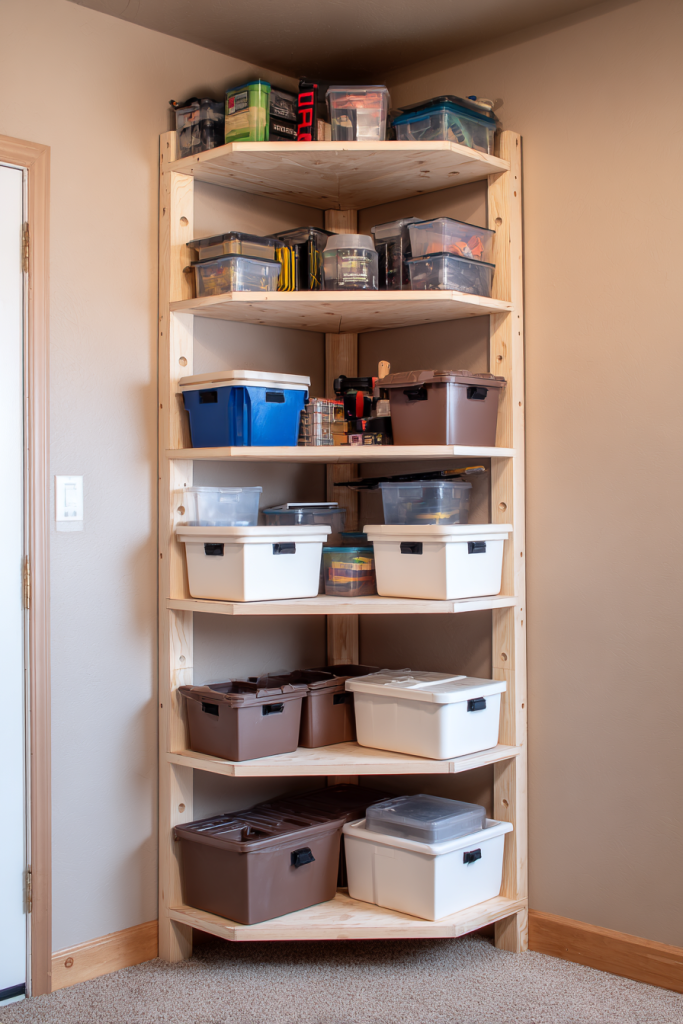
14. Corner Shelving Tower
Garage corners often become dead zones, but a custom corner tower maximizes this underutilized space beautifully. Design triangular shelves that fit snugly into the corner, graduating in size from bottom to top. Use sturdy three-quarter-inch plywood and secure each shelf with L-brackets mounted to both walls. Space shelves 14 to 16 inches apart for standard storage bin placement. The bottom shelf should be larger for bulky items while upper shelves can be smaller. This vertical storage solution keeps seasonal items, paint supplies, or automotive fluids organized without consuming valuable wall space. Finish with a waterproof sealant to protect against garage temperature fluctuations. Corner towers efficiently store items you need occasionally but want to keep accessible.
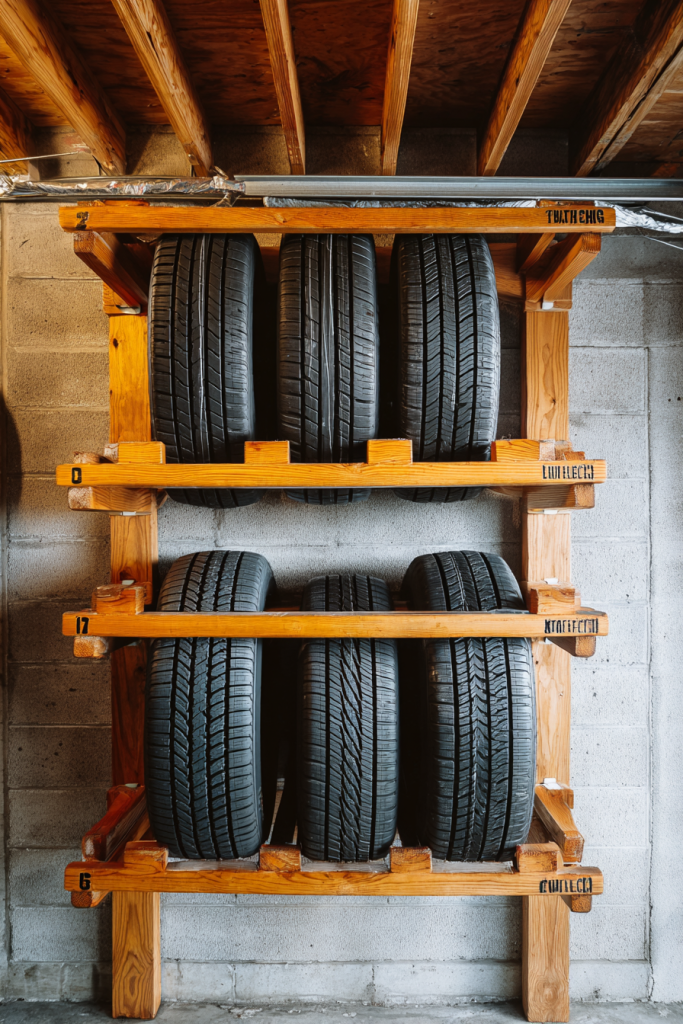
15. Tire and Wheel Storage Rack
Storing seasonal tires properly extends their lifespan while keeping them organized and out of the way. Build a simple horizontal rack using two-by-fours mounted to wall studs at tire width intervals. Create four separate cradles spaced to hold tires flat, which prevents sidewall damage. Mount the rack low enough for easy loading but high enough to keep tires off the damp floor. You can also build a vertical tower that stacks tires using a central pole system. Add labels indicating which vehicle and season each tire set belongs to for quick identification. Clean tires before storing and consider tire bags for added protection. This dedicated storage prevents tires from becoming tripping hazards while maintaining their condition between seasons.
Conclusion
Transforming your garage from chaotic storage space to organized haven doesn’t require a massive budget or expert carpentry skills. These fifteen DIY projects prove that strategic organization creates functional space while keeping everything accessible. I’ve implemented most of these solutions in my own garage, and the difference is remarkable.
Start with one or two projects that address your biggest pain points, whether that’s scattered tools or sports equipment chaos. Build momentum as you see the transformation taking shape. Remember that garage organization is personal; adapt these ideas to fit your specific needs and space constraints.
The key is maximizing vertical space, creating designated zones, and maintaining systems that work for your family. With these practical DIY solutions, you’ll finally park your car inside, find tools when you need them, and maybe even enjoy spending time in your newly organized garage. Your future self will thank you every time you walk into that beautifully organized space!
Frequently Asked Questions
How much does it cost to organize a garage with DIY projects?
Most DIY garage organization projects cost between $50 and $300 depending on materials and size. Simple solutions like pegboards and PVC pipe organizers run under $50, while custom shelving systems with quality materials might reach $200-300. Shopping sales at home improvement stores and using reclaimed materials significantly reduces costs. I’ve organized entire garage walls for under $100 by prioritizing budget-friendly options and building gradually over time.
What’s the best way to start organizing a cluttered garage?
Begin by completely emptying your garage and sorting items into keep, donate, and discard categories. This seems overwhelming but provides clarity on what you actually need to store. Clean the empty space thoroughly before implementing any organization systems. Next, measure your garage dimensions and identify zones for specific categories like tools, sports equipment, and seasonal items. Start with one high-impact project like wall-mounted tool storage before tackling more complex systems. This methodical approach prevents you from becoming discouraged while building organizational momentum.
How do I maintain garage organization long-term?
Successful maintenance requires clear labeling systems and designated homes for every item. Implement a “one in, one out” rule to prevent accumulation of unnecessary items. Schedule seasonal garage cleanups every three to four months to reset your systems. Make sure every family member understands the organization system and their role in maintaining it. Spend five minutes after each garage project returning tools and equipment to their proper places. Consistency matters more than perfection; small daily habits prevent clutter from overtaking your organized space.
What tools do I need for most garage organization DIY projects?
Essential tools include a drill with various bits, level, stud finder, measuring tape, and saw for cutting lumber. A miter saw or circular saw handles most cutting needs for shelving projects. You’ll also want safety equipment including goggles and work gloves. Most projects require basic fasteners like wood screws, lag bolts, and wall anchors. Having a pencil, square, and clamps makes installations more accurate. These fundamental tools handle about 90 percent of garage organization projects, and many homeowners already own them.