
Kitchen island design tips are essential for creating a space that balances beauty and functionality. When I first installed my kitchen island five years ago, I had no idea it would completely transform how my family lives and entertains. What started as a simple addition for extra counter space quickly became the heart of our home—a place where morning coffee happens, homework gets done, and dinner parties naturally gravitate toward animated conversations.
Kitchen islands have evolved far beyond basic functionality. Today’s islands serve as multi-purpose command centers that blend storage, seating, cooking, and style into one stunning focal point. Whether you’re planning a complete kitchen renovation or looking to upgrade your existing island, the right design choices can dramatically impact both your home’s value and your daily experience.
The beauty of a well-designed kitchen island lies in its ability to balance form and function seamlessly. From choosing the perfect materials and colors to optimizing storage and lighting, every decision contributes to creating a space that feels both practical and luxurious. I’ve learned through trial, error, and plenty of design inspiration that the most successful islands are those that reflect your lifestyle while enhancing your kitchen’s overall aesthetic.
In this comprehensive guide, I’ll share twelve proven strategies that will help you create a kitchen island that’s not only beautiful but perfectly suited to your needs. These tips combine practical functionality with stunning design elements, ensuring your island becomes a space you’ll love for years to come.
1. Choose the Right Size and Proportion
The foundation of any beautiful kitchen island starts with getting the dimensions absolutely perfect. I learned this lesson the hard way when my first island attempt left barely two feet of walkway space. Your island should maintain at least 36 inches of clearance on all sides, with 42-48 inches being ideal for busy kitchens.
Consider your kitchen’s overall footprint when selecting island dimensions. A general rule I follow is keeping the island no more than one-third the length of your kitchen. For standard kitchens, islands typically range from 4-7 feet long and 2-4 feet deep. The height should complement your existing countertops, usually matching at 36 inches or creating visual interest with a raised bar section at 42 inches.

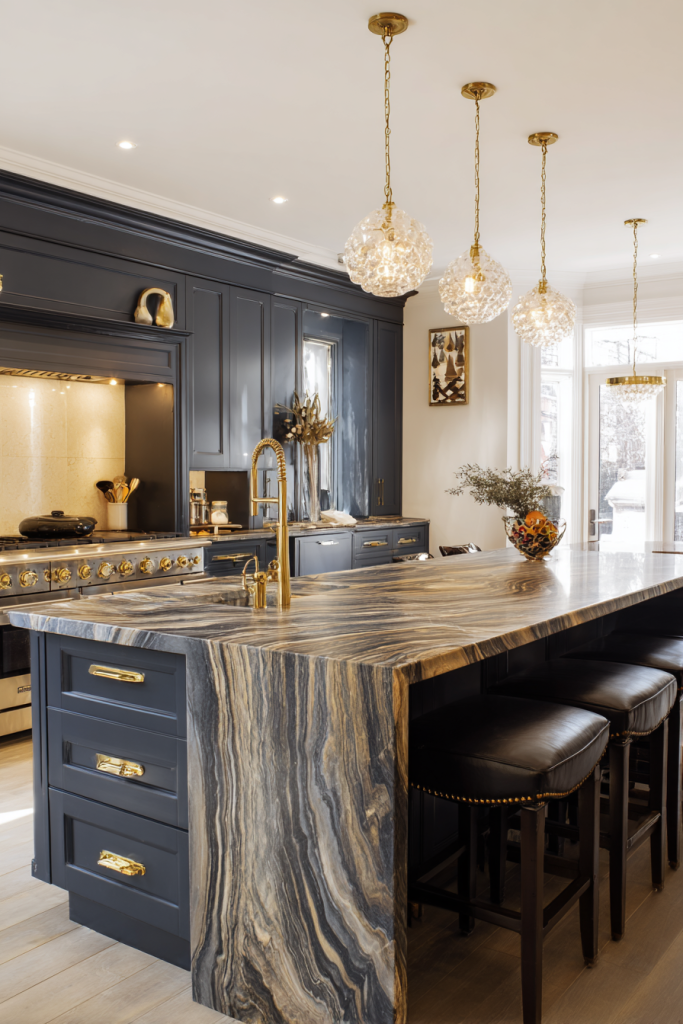
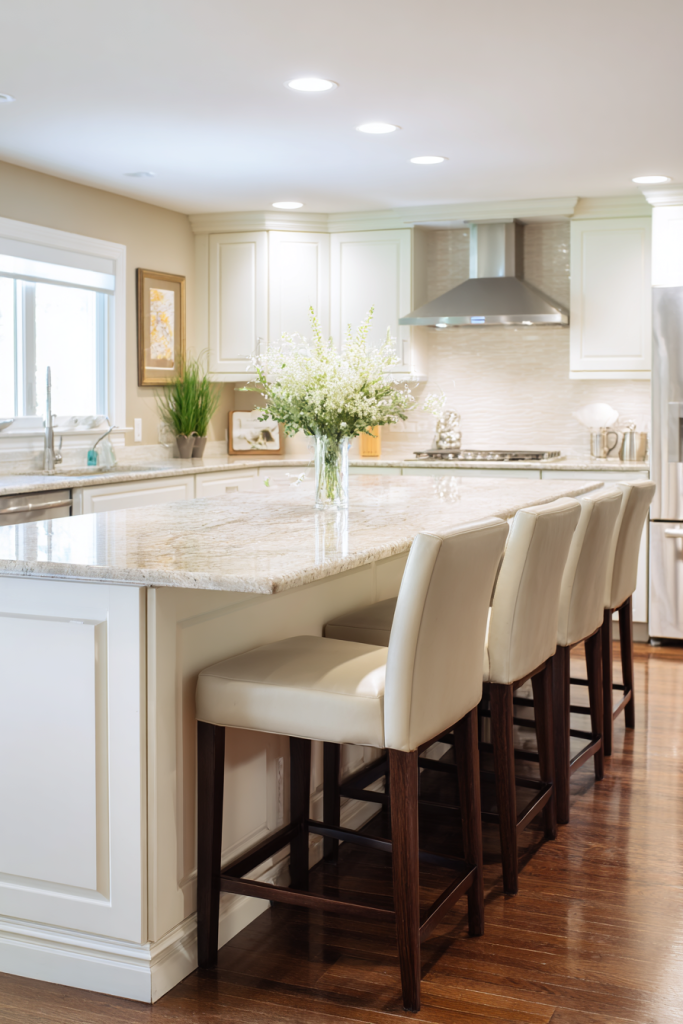
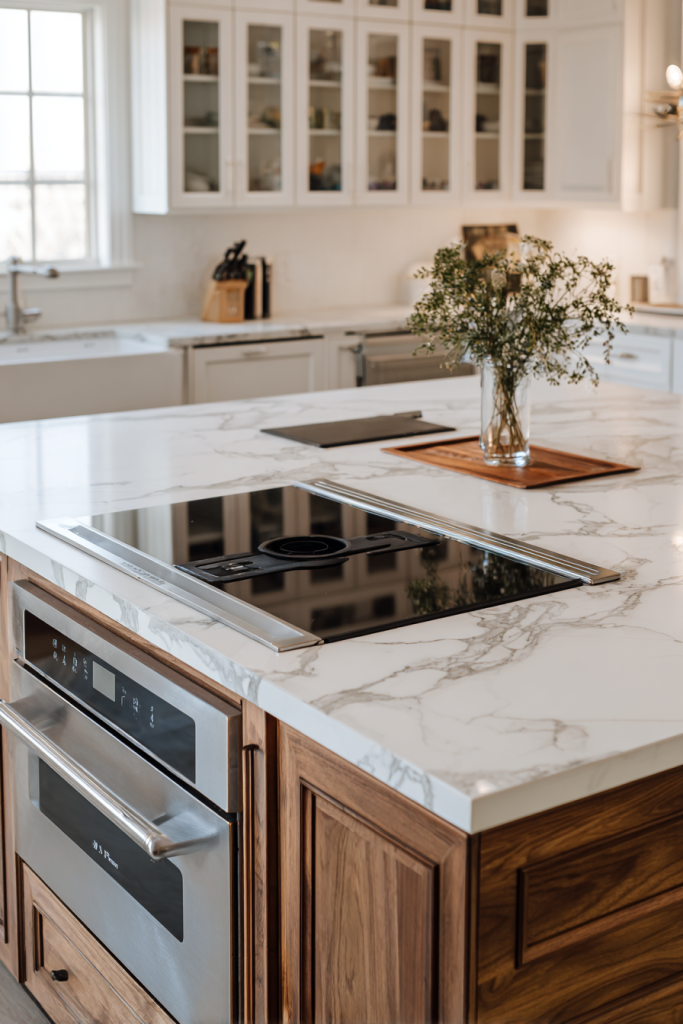
2. Invest in Quality Countertop Materials
Your countertop choice sets the entire tone for your kitchen island’s aesthetic and functionality. After researching extensively, I chose quartz for its durability and low maintenance, though natural stone options like marble and granite offer timeless elegance.
Consider how you’ll use your island when selecting materials. If you’re an avid baker, marble’s cool surface is perfect for pastry work. For families with young children, quartz provides stain resistance and easy cleanup. Butcher block adds warmth and works beautifully in farmhouse-style kitchens, while concrete offers an industrial, customizable option.
Designer tip: When mixing countertop materials, stick to a maximum of two finishes to maintain visual cohesion throughout your kitchen space.
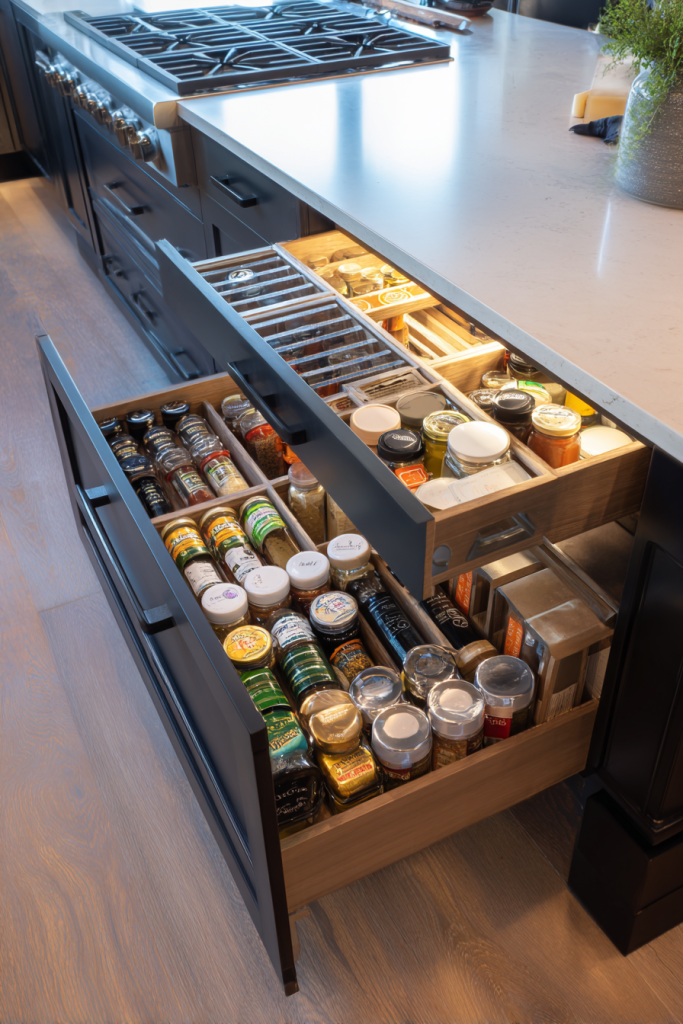
3. Maximize Storage with Smart Solutions
The most beautiful kitchen islands are those that solve storage challenges while maintaining clean lines. I’ve incorporated everything from deep drawers for pots and pans to specialized dividers for utensils and spices in my island design.
Consider your specific storage needs when planning your island’s interior. Deep drawers work better than cabinets for heavy items like stand mixers and large serving dishes. Include at least one drawer with electrical outlets for small appliances. Wine storage, cookbook shelves, or even a built-in trash pull-out can be seamlessly integrated.
Soft-close drawer slides and quality hardware make daily use feel luxurious. I recommend investing in full-extension slides that allow complete drawer access. Interior lighting in deep drawers helps you find items quickly and adds a professional touch.
4. Create Perfect Task Lighting
Proper lighting can make or break your kitchen island’s functionality and ambiance. I initially installed just two pendant lights over my 6-foot island, which left dark corners and created uneven lighting for food preparation tasks.
Plan for multiple lighting layers around your island. Pendant lights should hang 30-36 inches above the countertop and be spaced 24-30 inches apart for even illumination. Consider the size of your pendants in relation to your island—larger islands can handle bigger, more dramatic fixtures.
Under-cabinet lighting eliminates shadows when working at the island, while decorative lighting like chandeliers or statement pendants creates ambiance for entertaining. Dimmer switches are essential for transitioning from task lighting to mood lighting throughout the day.
5. Plan for Adequate Seating
Incorporating comfortable seating transforms your kitchen island from a simple work surface into a social hub. The key is balancing seating capacity with adequate legroom and visual flow throughout your kitchen space.
Allow 24-26 inches of width per person for comfortable seating, with at least 10-12 inches of knee space beneath the countertop overhang. Counter-height stools work with standard 36-inch islands, while bar-height seating suits 42-inch surfaces. Choose stools with backs for extended comfort during meals or homework sessions.
Consider swivel stools for easy conversation flow, and select materials that complement your kitchen’s overall design. Upholstered seats add comfort but require more maintenance than wood or metal options in busy kitchens.
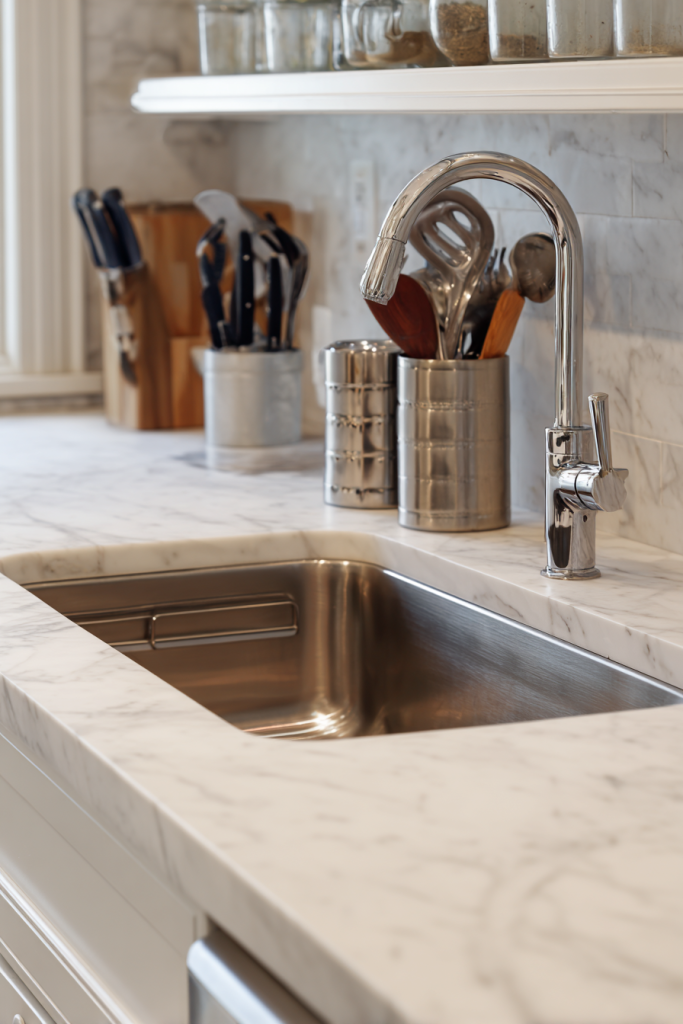
6. Incorporate a Secondary Sink or Prep Area
Adding a secondary sink to your kitchen island creates a dedicated prep zone that keeps the main kitchen sink free for cleanup tasks. This upgrade has transformed how efficiently I can prepare meals, especially when entertaining guests.
Choose an undermount sink style that complements your countertop material. Smaller prep sinks (15-18 inches) work perfectly for washing vegetables and filling pots, while larger versions can handle full dish washing duties. Position the sink off-center to maintain useful counter space on both sides.
Don’t forget to plan for proper plumbing and electrical requirements during the design phase. A garbage disposal can be added to island sinks, and having electrical outlets nearby accommodates small appliances for food preparation tasks.
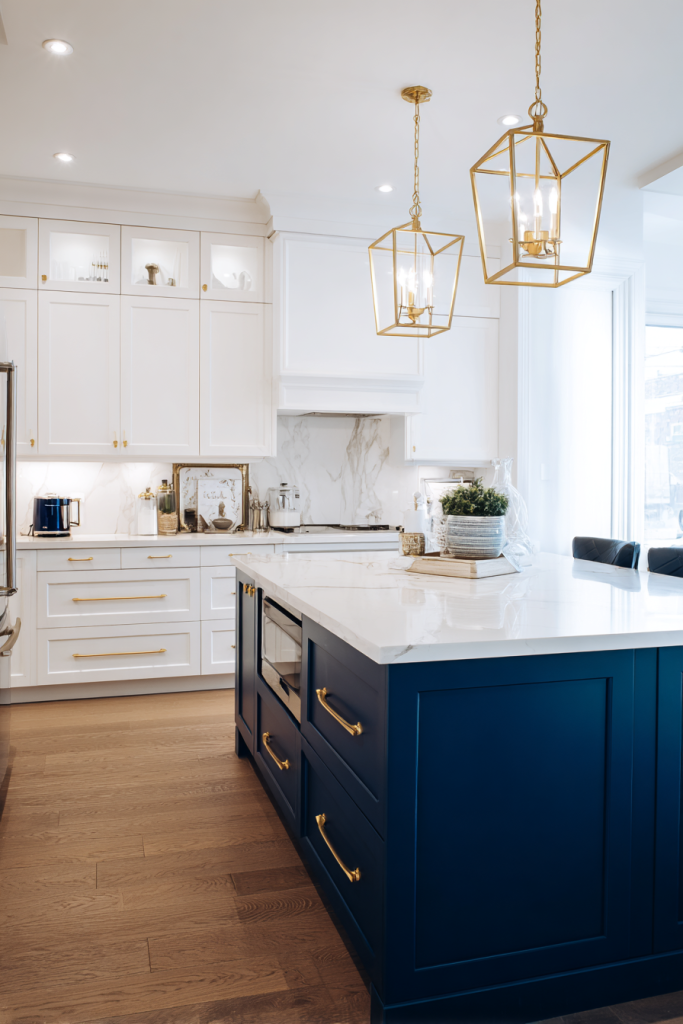
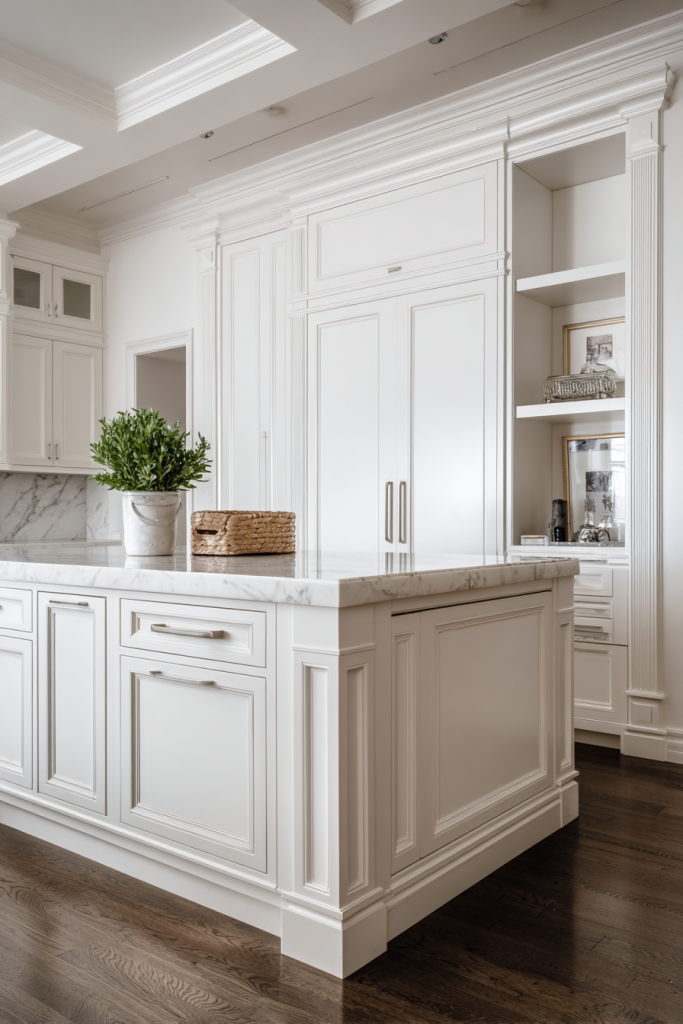
7. Choose Complementary Cabinetry Finishes
Your island cabinetry doesn’t have to match your perimeter cabinets perfectly, but it should create a cohesive design story. I chose a darker navy finish for my island while keeping white perimeter cabinets, which adds visual weight and creates a beautiful focal point.
Consider your kitchen’s overall color palette when selecting island finishes. Two-tone kitchens work beautifully when colors share similar undertones or create intentional contrast. Classic combinations include white perimeter cabinets with natural wood islands, or gray perimeter cabinets with navy islands.
Hardware consistency is crucial for visual cohesion. Use the same hardware style and finish across all cabinetry, or choose complementary metals that work together. Brass and black combinations are particularly striking in modern farmhouse designs.
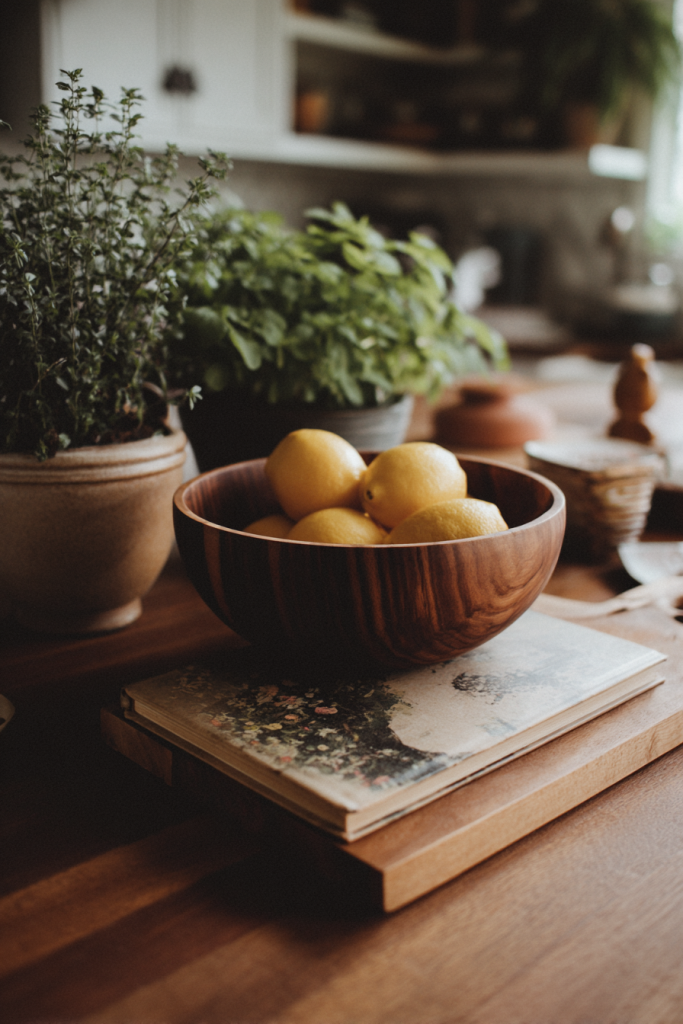
8. Add Personality with Decorative Elements
The finishing touches transform a functional kitchen island into a stunning centerpiece that reflects your personal style. I’ve found that carefully chosen decorative elements make the space feel curated and lived-in rather than sterile.
Fresh flowers or potted herbs bring life and color to your island’s surface. A beautiful bowl filled with seasonal fruit serves both decorative and practical purposes. Consider a small collection of cookbooks, attractive storage containers, or a vintage cutting board displayed vertically for visual interest.
Avoid cluttering the surface with too many items—the key is selecting a few meaningful pieces that enhance rather than overwhelm your island’s design. Rotate decorative elements seasonally to keep the space feeling fresh and updated.
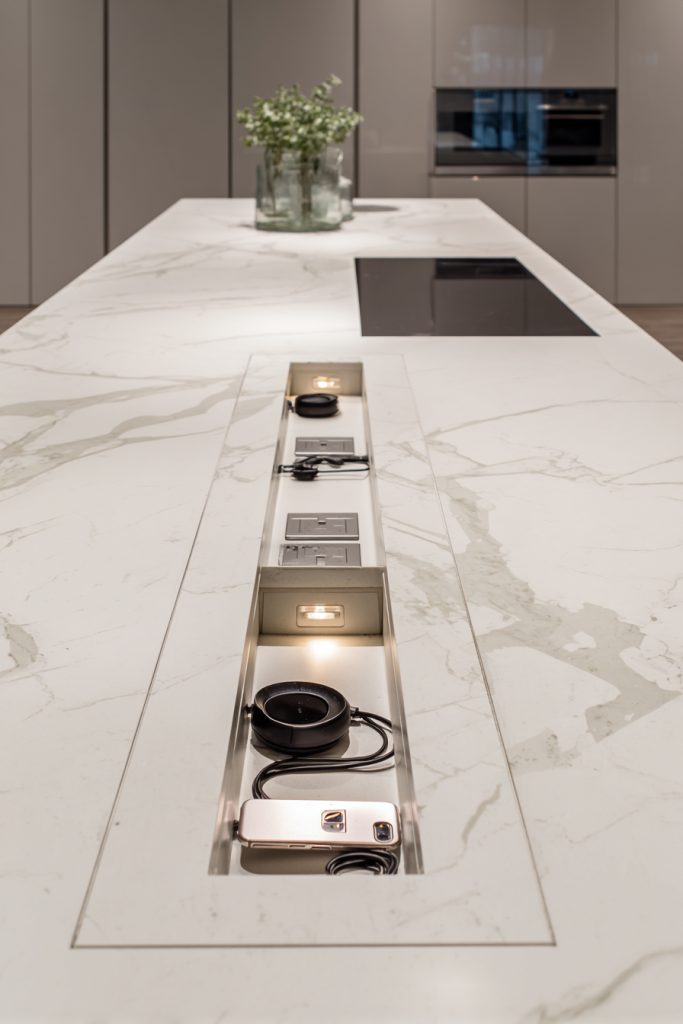
9. Install Functional Power Sources
Modern kitchen islands demand adequate electrical planning to accommodate today’s cooking and entertainment needs. I initially underestimated how many outlets I’d need and found myself constantly unplugging appliances to make space for others.
Plan for at least two electrical outlets on your island, preferably on opposite ends to provide flexibility for multiple appliances. GFCI outlets are required by code in kitchen areas. Consider pop-up outlets that remain hidden when not in use, maintaining your island’s clean aesthetic lines.
USB outlets are increasingly popular for charging devices while cooking or supervising homework at the island. If you plan to incorporate appliances like wine refrigerators or warming drawers, ensure adequate electrical capacity during the planning phase. Working with a qualified electrician early in the design process prevents costly modifications later.
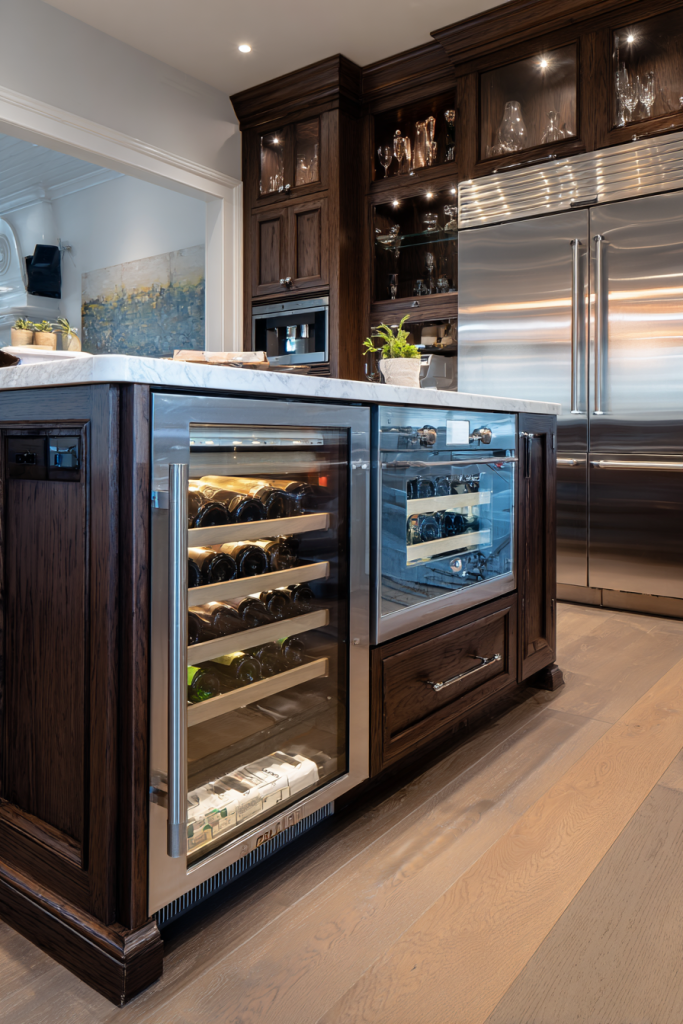
10. Consider Built-In Appliances
Integrating appliances into your kitchen island creates a streamlined appearance while adding incredible functionality. My built-in wine refrigerator and warming drawer have become indispensable for entertaining and everyday meal preparation.
Popular built-in options include wine refrigerators, beverage centers, warming drawers, and even dishwashers for larger islands. Microwave drawers provide convenient access while maintaining clean sight lines. Each appliance requires specific ventilation and electrical requirements that must be planned during the design phase.
Consider your lifestyle when selecting built-in appliances. Wine enthusiasts benefit from proper wine storage, while busy families might prefer a second dishwasher or warming drawer for keeping food at serving temperature during hectic weeknight dinners.
11. Design for Your Cooking Style
The most beautiful kitchen islands are those designed around how you actually cook and entertain. I’m an avid baker, so I prioritized marble surfaces and ample storage for baking equipment, while a friend who loves Asian cuisine incorporated a built-in wok burner.
Think about your cooking habits when planning your island’s features. Frequent entertainers benefit from larger surfaces and extensive seating. Baking enthusiasts need cool surfaces and specialized storage for mixers and tools. Those who love grilling might incorporate indoor grilling surfaces or warming areas.
Don’t forget about cleanup considerations. Position your island to create an efficient work triangle between sink, refrigerator, and cooking surfaces. Easy-to-clean surfaces and adequate storage for cleaning supplies make daily maintenance effortless and enjoyable.
12. Plan for Future Flexibility
The most successful kitchen islands are designed with adaptability in mind. I chose modular storage systems and neutral finishes that allow me to update accessories and functionality as my needs change over time.
Select timeless materials and finishes that won’t look dated in five to ten years. Neutral stone countertops, classic cabinet styles, and quality hardware maintain their appeal longer than trendy alternatives. Modular interior storage systems can be reconfigured as your needs evolve.
Consider how your family’s needs might change over time. Young families might prioritize safety features and easy cleanup, while empty nesters might want more entertaining-focused elements. Electrical and plumbing rough-ins for potential future appliances cost little during initial construction but are expensive to add later.
Conclusion
Creating the perfect kitchen island requires thoughtful planning that balances beauty, functionality, and your unique lifestyle needs. From selecting the right proportions and materials to incorporating smart storage solutions and adequate lighting, each decision contributes to a space that serves as your kitchen’s stunning focal point.
Remember that the most beautiful islands are those that reflect how you actually live and cook. Don’t be afraid to invest in quality materials and professional installation—a well-designed island adds significant value to your home while enhancing your daily experience for years to come.
Take time to plan thoroughly, considering both immediate needs and future flexibility. With these twelve tips as your guide, you’ll create a kitchen island that perfectly combines form and function, becoming the heart of your home where memories are made and shared.
FAQ Section
How much does a custom kitchen island typically cost?
Custom kitchen island costs vary significantly based on size, materials, and features. Basic islands start around $3,000-$5,000, while high-end custom islands with premium materials and built-in appliances can range from $10,000-$20,000 or more. Factors affecting cost include countertop materials, cabinetry finishes, electrical and plumbing requirements, and built-in appliances. Getting multiple quotes from qualified contractors helps establish realistic budget expectations for your specific project.
What’s the ideal distance between a kitchen island and surrounding cabinets?
The standard recommendation is 42-48 inches of clearance between your island and perimeter cabinets or appliances. This allows comfortable passage for multiple people and provides adequate space for cabinet doors and drawers to open fully. In smaller kitchens, 36 inches minimum clearance can work, but anything less creates traffic flow problems and safety concerns during busy cooking periods.
Can I add an island to my existing kitchen?
Many existing kitchens can accommodate islands with proper planning. Key considerations include available floor space, electrical and plumbing accessibility, and traffic flow patterns. Portable or semi-permanent islands offer flexibility for kitchens where permanent installation isn’t feasible. Consulting with a kitchen designer helps determine the best island solution for your specific space and budget constraints.
What countertop material works best for kitchen islands?
The best countertop material depends on your cooking style, budget, and aesthetic preferences. Quartz offers durability and low maintenance, making it ideal for busy families. Natural stone like marble provides beauty and functionality for baking enthusiasts. Granite offers excellent durability and heat resistance. Butcher block adds warmth and works well in traditional kitchens but requires more maintenance than stone alternatives.